
Scenes, agents, and the editor#
A scene describes the equipment on the table: bodies, their actuators, walls, targets, and the rules that award reward. The running world describes what that equipment is currently doing. This distinction explains the editor’s most important behavior: editing a scene prepares new initial conditions in a draft. Moving a kart changes its proposed starting position. Apply and restart builds that proposal into a new paused experiment; it does not continue the kart’s current drive.
Start with Getting started with the control laboratory for installation and a first run. This page is a practical editor course: first move food and tune a drone, then assemble a cargo course, then build a kart route. Use the downloads below to start each exercise independently. This page covers constructing the experiment. Controls, planners, and diagnostics covers operating its controller, and Record, replay, and continue experiments covers preserving and revisiting its motion. The original Continuous-control laboratory provides further technical reference material.
Choose an experiment#
Use Environment to choose one of six tasks. Racing offers six kart circuits through its separate Select track dropdown. Choosing a different preset stages its scene and clears the editor’s undo history. Press Apply and restart to save the preceding run and load the new world paused. The six illustrated task walkthroughs are Asteroid harvesting: hook, tow, and deliver, Ants & drops: collect and deliver resources with a fleet, Tandem flight: move two rockets in formation, Collaborative mining: lift and haul a rock together, Thinking graphs: inspect the futures a rocket considered, and Racing: drive and understand all six circuits. The SCORE panel shows a task counter, which is different from the accumulated reward that the controller optimizes. Reward can include travel, formation rewards, collision penalties, and checkpoint rewards.
Environment |
What to try |
Main score |
|---|---|---|
Asteroid harvesting |
Guide the tug, acquire cargo with its automatic tether, and bring ore into the delivery base. |
Cargo deliveries |
Ants & drops |
Coordinate 1–128 rockets, drones, karts, or harvesters collecting food; defaults to 5 harvesters. |
Food collected |
Tandem flight |
Move through shared checkpoints while maintaining desired pair distances and avoiding collisions. |
Gates crossed |
Collaborative mining |
Haul one rock with two rockets; see the mining guide. |
Cargo deliveries |
Thinking graphs |
Use the harvesting task to inspect alternative futures, cloning, and ancestry. |
Cargo deliveries |
Racing |
Choose a circuit with Select track, then drive its checkpoint zones in order. |
Laps completed; next checkpoint |
In Tandem flight, Gates crossed reports the minimum crossing count across the controlled vehicles: the group advances only when everyone reaches the shared checkpoint. A vehicle that gets ahead waits without another crossing credit, while its position continues contributing to checkpoint proximity. The next checkpoint becomes eligible on the frame after the last vehicle crosses. The defaults are Checkpoint proximity = 1, checkpoint bonus 30, formation weight 50, squared travel weight 1, wall collision penalty 100, and body collision penalty 2.
Each physics frame, checkpoint proximity uses the shared checkpoint from the
start of the frame and the vehicles’ center positions after movement. Average
the distances of all controlled vehicles, including those that have already
registered, then compute radius / (radius + mean distance) and multiply by the
weight. At the default weight, this gives positive reward even at unchanged
positions. The scene JSON key remains rewards.progress; the label in Rewards
is Checkpoint proximity.
The target changes on the next frame after all vehicles register.
Each eligible crossing pays the checkpoint bonus divided by the total controlled vehicle count. Zero checkpoint weights stop those payments while leaving the counters and shared-stage lock active. Reset defaults restores the task-aware values above. The tandem guide gives a controlled exercise.
Choose vehicles for any environment#
Use Vehicle type and Vehicle count in Setup in any of the six environments, including every racing track. Choose Rockets, Drones, Karts, or Harvesters for the whole group and enter a whole-number count from 1 to 128. Presets retain their original defaults until you change them; Ants & drops starts with 5 harvesters. Rockets use two action channels per vehicle; the other three types use three. The count determines how many vehicles move in the arena; Walkers determines how many possible futures the planner considers.
Changing type preserves the vehicle count and starting positions, world edits, rocks, tethers, rewards, and environment settings, while replacing vehicle physics and visuals with the selected type’s defaults. Count changes preserve existing starting positions and world edits. Both changes enter the draft; one Apply and restart commits them together, saves the preceding run, and starts paused. Restart retains the current scene and vehicle configuration. Each environment remembers your selected type within the tab session; Racing shares its choice across all tracks. Explicit Flight mode settings remain in force; otherwise rockets and drones automatically use flight.
Loading a saved scene preserves its concrete bodies. A fleet that does not match one standard type displays the disabled Mixed / custom placeholder. Choosing a standard type then replaces the whole fleet’s vehicle definitions.
Configure Ants & Drops#
The arena has 24 pickup slots. Collect a drop and that slot returns after three
simulation seconds at a seeded random playable position. This repeats indefinitely:
an empty arena can mean that all 24 slots are waiting to return. Pausing the world
also pauses their timers. Each vehicle now carries up to five drops. A full vehicle
switches to Return / unload, stops collecting, and must enter the refinery at
[12, 36] (radius 6) to empty its tank over two simulation seconds. Leaving the
zone interrupts unloading; the vehicle remains in the return phase until empty.
Select a controlled vehicle in Inspect to inspect it; the editor also retains
the selected vehicle’s cargo readout. The score
note also reports delivered units and completed loads; these differ from the
number of pickups collected.
Choose a kart circuit#
Choose Racing in Environment, then use Select track to choose a circuit. The tracks are ordered from Easy to Hard. Start with Violet Circuit or Roots Oval to get a feel for steering. Then try Fearless Circuit: a corner now sets up the next one, so entering too quickly can leave you poorly placed for the following bend. The Hard circuits add close hairpins or obstacles that leave less room to recover. Every circuit starts with the same kart physics; Vehicle type lets you try any of the four vehicles on that route. The difficulty labels describe the route you must drive.
The preview beneath Select track shows the active scene’s outline, difficulty, racing direction, and checkpoint count. Historical circuits also link to a reference video. Look at that outline before driving: a long straight followed by a tight bend calls for a different approach from an open oval. Selecting another circuit stages its scene. Apply and restart starts a fresh run and updates the checkpoint count. Imported scenes and replay archives keep their own geometry, so the preview follows the scene you actually loaded.
The five historical layouts were reconstructed from Sergio Hernandez’s kart videos, with proportions traced by hand and scaled uniformly. Their distances are simulation units, not surveyed track measurements. Sepang Kart uses the go-kart layout shown in the videos, not the Formula One circuit. Labyrinths, caves, and non-racing arenas are outside this circuit collection.
Track |
Difficulty |
What to try |
Checkpoints per lap |
|---|---|---|---|
Violet Circuit |
Easy |
Learn the controls on the broad original lab circuit. |
16 |
Roots Oval |
Easy |
Practise braking and steering on the historical oval. |
50 |
Fearless Circuit |
Medium |
Connect bends and negotiate a deep hairpin. |
130 |
Sepang Kart |
Hard |
Tackle the historical go-kart layout’s close hairpins. |
151 |
Original Obstacle Circuit |
Hard |
Steer around bollards and edge intrusions. |
133 |
Fearless Obstacle Field |
Hard |
Thread the islands before returning to linked hairpins. |
128 |
Drive a circuit#
Select a kart circuit, apply the configuration, enter Drive, and press Start driving. Click the world so a number field no longer receives keystrokes. Hold W to accelerate, use A/D to steer, S for reverse throttle, and Space to brake. Use Follow agent for a close view, and 2D / 3D to change the camera angle. Select a controller in Controller, apply any pending changes, then return to Inspect and press Run when you want the planner to drive. Releasing driving keys returns to neutral input while physics continues; Pause stops the world.
The gold checkpoint is the next target. A checkpoint counts when the kart’s centre enters its circular zone; passing through a decorative arch is not a separate timing measurement. After all zones in the selected circuit, the lap counter increases and the target returns to checkpoint 1. Waiting at the finish or visiting a later checkpoint first does not complete a lap. The zones do not impose a crossing direction. In ordinary live play, completing a lap does not stop the world; each preset’s experiment success criterion is its checkpoint count, meaning one lap (16 gates for Violet Circuit). See Experiments, comparisons, and performance for episode limits.
The walls are collidable but nonlethal in these kart presets. The asphalt, painted guide, curbs, and gantry help you see the course; native boundary and hole polygons define its physical limits. Replaying a world restores the gate counter, lap display, and highlighted target along with the kart’s movement.
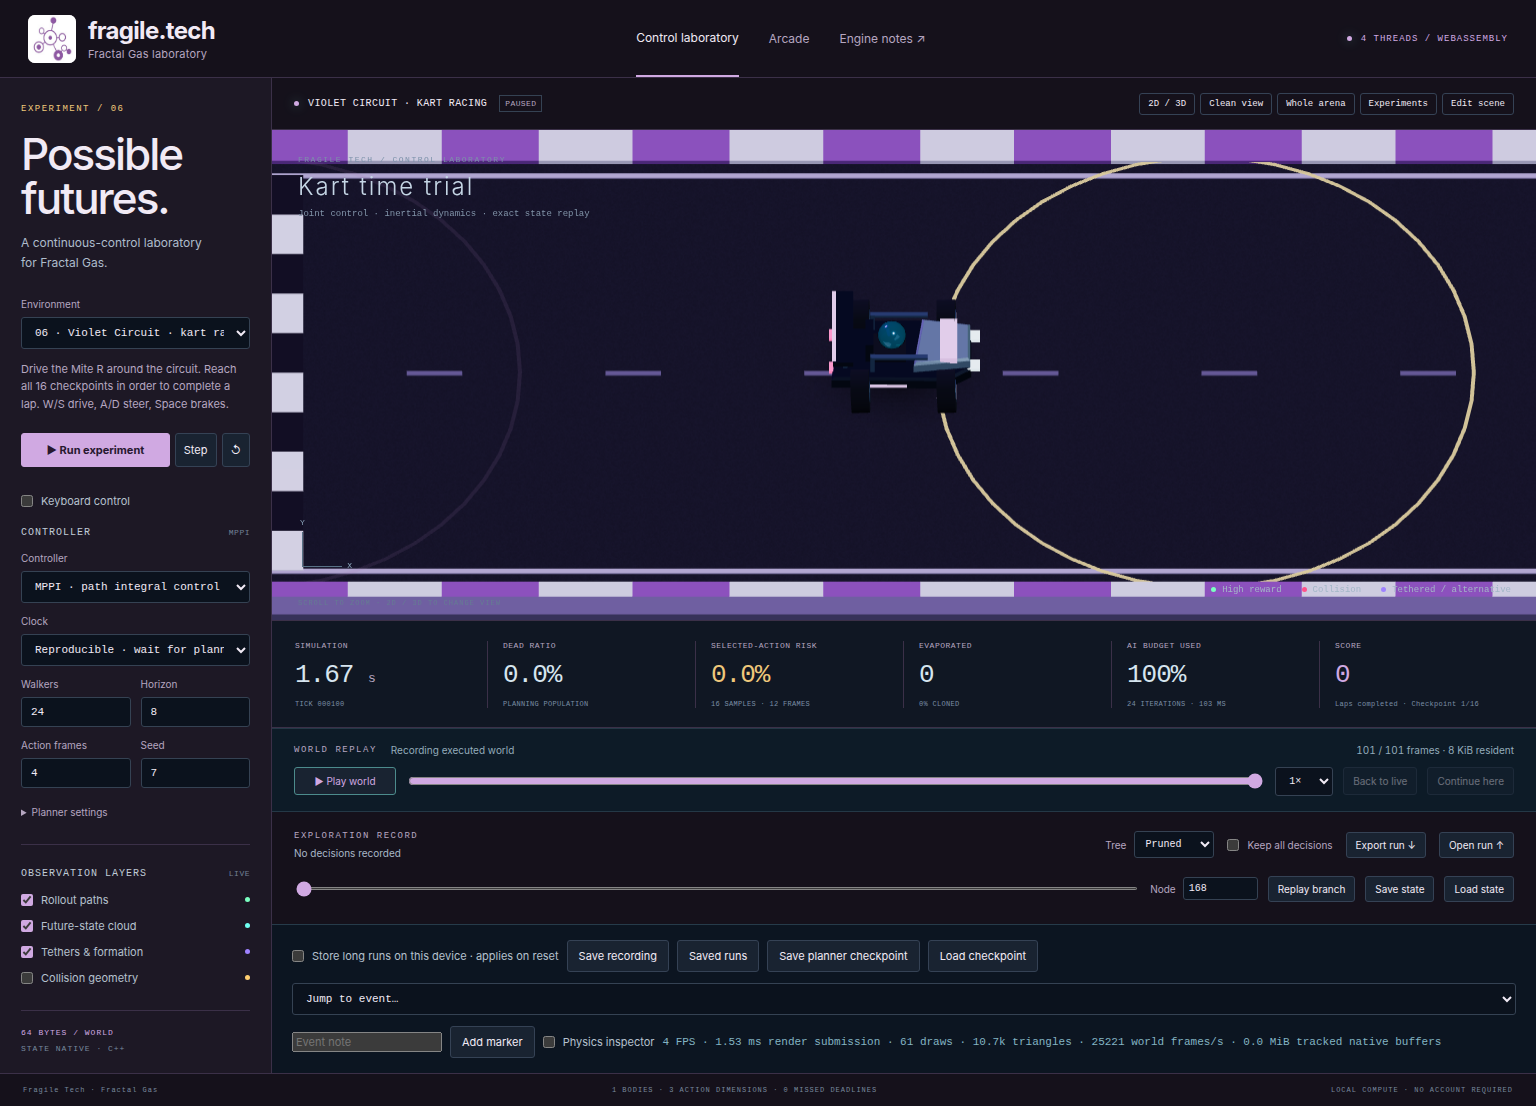
Fig. 24 Follow the kart to inspect its steering and motion while keeping checkpoint progress visible.#
Place and move objects#
Choose Edit to pause execution and open the scene tools. Each property change, placement, drag, deletion, or duplication updates a draft. The existing run remains intact while you arrange the new starting conditions. Undo and Redo navigate those draft revisions; they do not recompile physics or rewind recorded motion.
Press Apply and restart when the draft is ready. The Lab prepares the new world and saves the preceding nonempty run before replacing it. The new world starts paused. Failed preparation or saving retains the original world and draft for correction or recovery. Discard restores the active scene. Leaving a dirty editor offers Apply and restart, Discard, and Cancel; closing a clean editor stays paused. Ordinary settings-panel changes preserve the draft.
With Select & move, click a body, food pickup, delivery base, unloading refinery, checkpoint, or gravity well. Shift-click adds or removes an entity from the selection. Drag a selected entity to move the whole selection by the same displacement; release to update the draft. Click empty space to clear the selection. The last selected entity is the one shown in the property editor. Selection does not itself modify the scene.
The viewport supports wheel zoom and middle-button, right-button, or Alt-drag panning. Panning releases camera following. Follow agent follows a selected body, or the first controlled body when no body is selected. The same button then reads Whole arena; press it to stop following, recentre, and reset zoom. After applying an import or restarting, the camera shows the whole arena and the button reads Follow agent. Camera changes do not affect physics. In Inspect, clicking selects a body for the inspector, camera follow, action guides, and subsequent Drive controls. Choose Planner decisions in the timeline when you want clicks to select nearby recorded search nodes instead.
Tool |
Gesture and result |
|---|---|
Agent |
Choose Agent type, then click a starting position. |
Asteroid |
Click to place a passive, six-vertex convex cargo body of mass 3 kg. |
Food pickup |
Click to place a pickup with radius 0.4 m. |
Delivery base |
Click to place a delivery zone for physical cargo bodies, with radius 2.5 m. |
Unloading refinery |
Click to place a tank-unloading zone with radius 2.5 m. Enable the top-level |
Checkpoint gate |
Click to append a checkpoint with radius 2.5 m to the ordered gate list. |
Gravity well |
Click to place a source with strength 25 m³/s² and softening 3 m. |
Tether · click source, then cargo |
Click two distinct bodies; creates a spring with stiffness 25 N/m and damping 6 N·s/m. The second body need not be cargo. |
Draw hole / pillar |
Click at least three vertices, then Finish polygon to append a hole. |
Draw outer boundary |
Click at least three vertices, then Finish polygon to replace the outside boundary. |
Switching tools discards an unfinished polygon or first tether endpoint. Polygon vertices use world coordinates in metres. The compiler closes the ring; do not repeat the first vertex. Boundaries may be concave but cannot cross themselves. Holes must lie inside the outer boundary without intersecting other rings or nesting inside another hole. Body and zone centres must lie in playable space. Dynamic body hulls, in contrast, must be convex and have no more than 32 vertices.
Tethers and polygon vertices are not selectable with Select & move. Edit their parameters and coordinates in the complete scene JSON. Creating a tether gives it an initial rest length from the first body’s configured starting position to your second click; click the second body near its centre and use scene JSON for an exact length; automatic cargo hooking and breaking parameters are additional JSON fields, not separate placement tools.
Know which control changes what#
Changing a field prepares a proposal; Apply properties or Apply entity writes it into the shared scene draft. Apply and restart commits that draft to physics; moving the camera only changes what you see. The two property editors do not share an unsaved draft. If you change both the text and the number boxes, the button you press chooses which draft is used. Apply one property edit to the scene draft before starting the other. The selection remains available while its entity exists; the numeric and JSON displays refresh from the updated draft.
Use 2D / 3D to choose a top-down view before placing geometry. Coordinates are world coordinates, independent of the camera. A positive x displacement means the same physical displacement after you pan or change the view. Click approximately, then enter exact position · 0 and position · 1 values in the numeric editor.
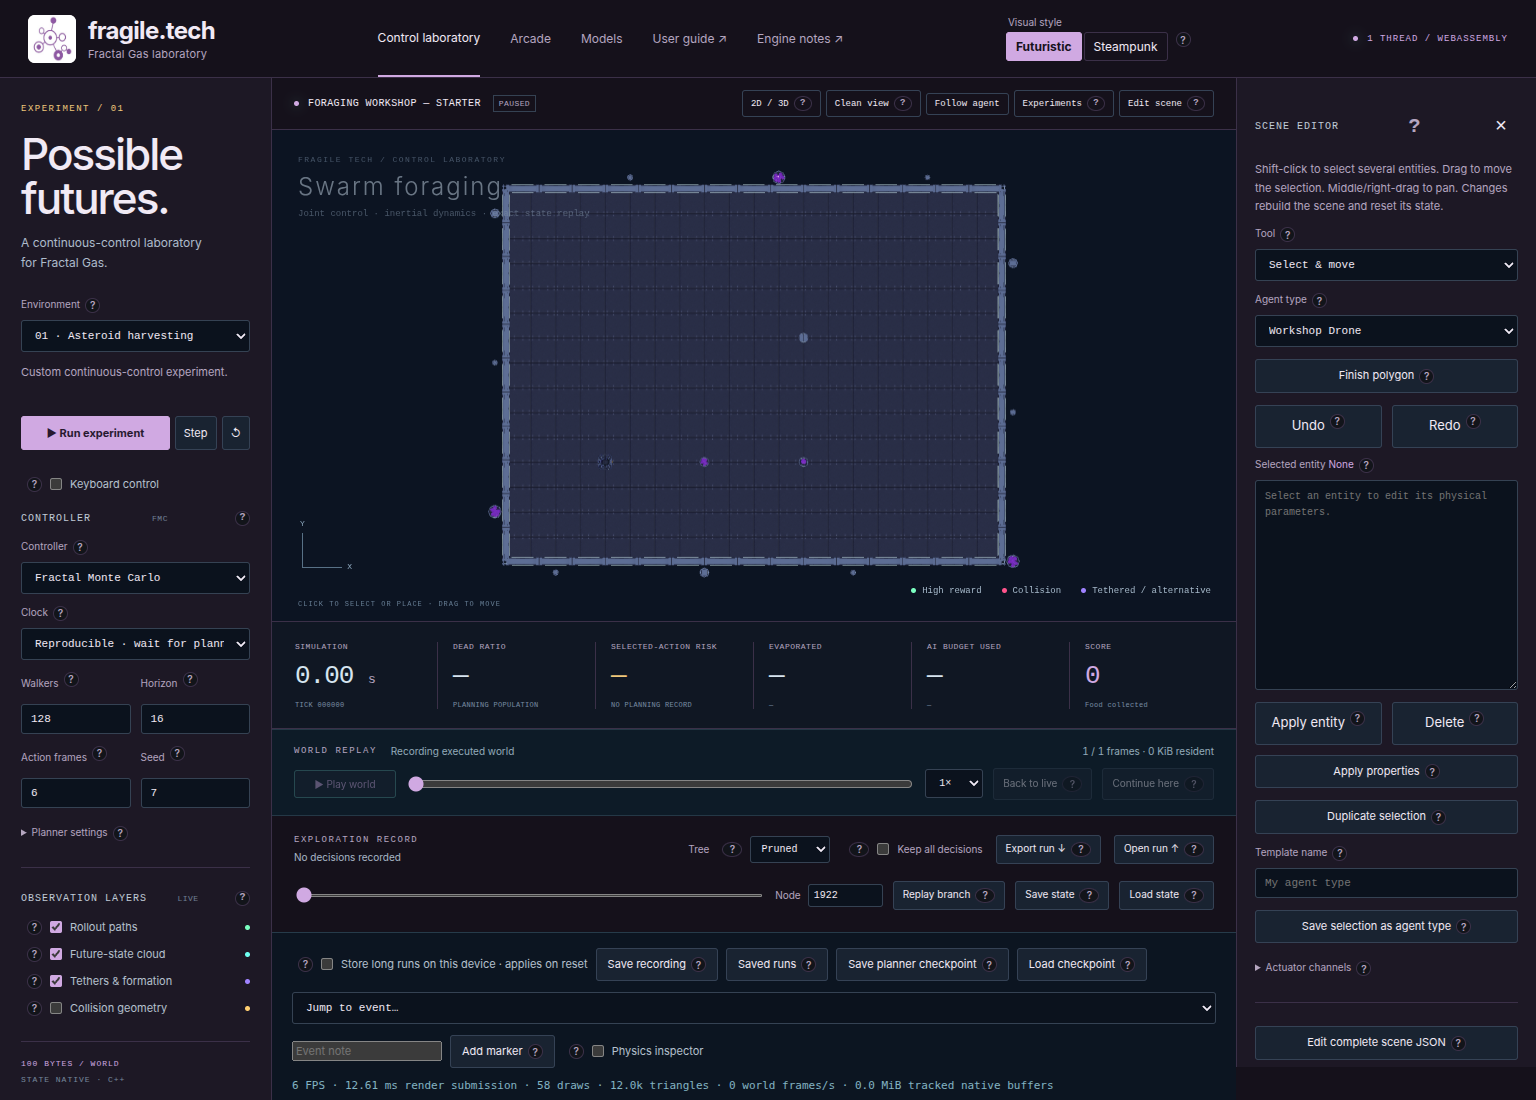
Fig. 25 Choose Edit to bring draft construction tools alongside the paused world.#
Control |
Prerequisite and effect |
When it takes effect |
|---|---|---|
Edit / panel × |
Enter or leave scene editing; opening pauses execution. Leaving a dirty draft offers Apply and restart, Discard, or Cancel. |
Mode changes do not resume execution. |
Tool |
Choose selection, placement, tether, or polygon mode. Cancels unfinished polygon vertices and the pending first tether endpoint. |
Next world click. |
Agent type |
Select a catalog type for the Agent tool. Does not convert an existing selection. |
Next agent placement. |
Finish polygon |
At least three vertices entered with a polygon tool. Replaces the boundary or appends a hole. |
Updates the scene draft; Apply and restart commits it to physics. |
Advanced entity JSON → Selected entity |
Shows the last selected entity’s raw JSON and zero-based collection/index label. |
Text remains a draft until Apply entity. |
Apply entity |
Requires a selection and valid entity JSON. Replaces only the last selected entity. |
Updates the scene draft; Apply and restart commits it to physics. |
Numeric boxes / Apply properties |
Require a selection; include resolved inherited values. Applies all displayed numbers to that entity. |
Updates the scene draft; Apply and restart commits it to physics. |
Duplicate selection |
Copies all selected entities, offset by |
Updates the scene draft; Apply and restart commits it to physics. |
Delete |
Removes all selected entities and incident tethers. Keep at least one body in the scene. |
Updates the scene draft; Apply and restart commits it to physics. |
Undo / Redo |
Restore scene revisions, including geometry and initial conditions. No effect when the respective history is empty. |
Updates the draft without recompiling physics. |
Template name / Save selection as agent type |
Select a body; enter a unique 1–80 character name. Reserved names |
Adds a scene-local type to the draft. |
Actuator channels |
Expand to inspect all compiled bodies’ channels. Set sliders within their native bounds. |
Slider movement alone does not advance physics. |
Apply action · 1 frame |
Submit the entire slider vector. No selection is required. |
Pauses the planner and advances one physics frame. |
Edit complete scene JSON |
Opens a draft of the whole scene, including items without a selectable viewport handle. |
Compile scene stages the text; Apply and restart commits it to physics. |
JSON dialog × |
Close without applying the current text. Copy unfinished work elsewhere before closing. |
No scene edit. |
Compile scene |
Parse the complete JSON into the scene draft. |
Apply and restart performs native compilation and replaces the world after successful preparation and saving. |
Save / Open → Export JSON ↓ |
Download the active scene definition; apply pending edits first to include them. |
Saves a |
Save / Open → Import JSON ↑ |
Choose a complete scene |
Stages an undoable scene replacement; Apply and restart loads it. |
Exercise 1: customize a foraging arena#
Download the foraging starter
and the finished example.
These are complete 40 by 30 metre scenes. The starter has one drone at [8, 8] and
three food pickups. A small arena with only a few objects makes selection errors
easy to spot. Pickups return after three simulation seconds, so collected food is
not permanently removed.
Open Save / Open → Import JSON ↑ and choose the starter. Close Save / Open, press Apply and restart, then choose Edit. Wait until the world is ready. Choose a top-down view; importing already restores the whole-arena view. If you subsequently enable following, press Whole arena to return. Verify the workshop scene title and its one drone and three pickups. After a custom import, Environment may still display the previously selected preset name; the title and loaded contents identify your current scene. Selecting a preset from that dropdown stages its scene with the vehicle choices retained for that environment during the tab session.
Set Tool to Select & move. Click the pickup at
[16, 8]. The heading should saypickups / 0; if it saysbodies / 0, you selected the drone.In the numeric fields set position · 0 to
18, position · 1 to10, and radius to0.6. Press Apply properties once. The draft pickup moves; the clock stays paused at its existing tick, and the selection remains available in the draft.Click that pickup again, then press Duplicate selection. The copy appears at
[20, 12]with the same0.6metre radius. Reselect it to confirm its numbers.Press Undo to remove the copy; press Redo to restore it. For a deletion exercise, reselect the copy, press Delete, then Undo. You should again have four pickups. Each operation changes the draft; none rewinds a flight.
Select the drone. Set mass to
2and drag to0.4; press Apply properties. Reselect the drone. In Selected entity, add or update"visual": {"color": "#74d7c4"}while keeping all other fields and valid commas. Press Apply entity. Its type supplies the drone model; the instance supplies the identification color. With the default authored drone asset, this changes the small underbody marker; its painted bodywork keeps its authored palette.Reselect the drone and inspect its mass and drag. Press Apply and restart, enter Drive, and set its force_x channel to the positive end and press Apply action · 1 frame several times. A single 1/60-second frame produces very little visible motion. Set all channels back to zero before the next test.
Open Save / Open → Export JSON ↓. Import that saved file, apply and restart, and verify four pickups, the saved
visual.colorvalue (and the small identification marker), and mass2. Import the finished download to compare the same intended initial configuration; the text need not be byte-for-byte identical because applying properties also writes inherited defaults onto the body.
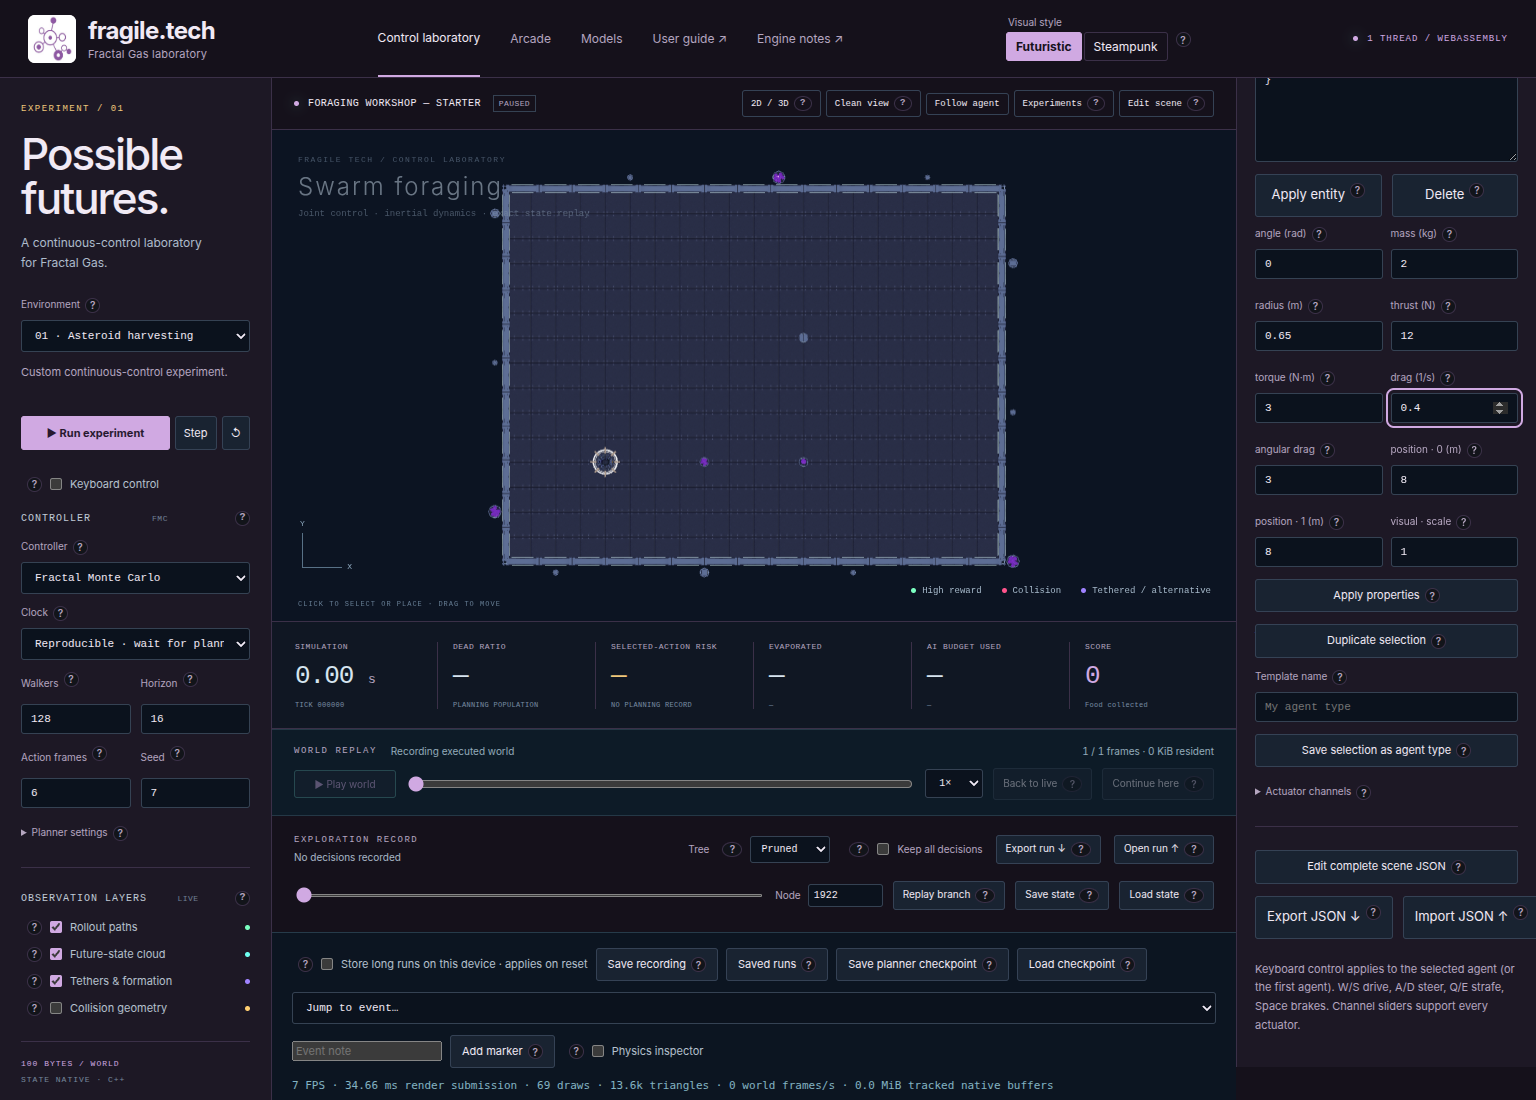
Fig. 26 The drone’s mass 2 kg and drag 0.4 per second are prepared in the numeric fields.
Press Apply properties to commit them, then reselect the drone to verify the values.#
Move several objects without changing their spacing#
In the foraging scene, choose Select & move and click one pickup.
Hold Shift and click another. The heading reports two selections. The last selected entity supplies the JSON and number boxes.
Drag either selected pickup a short distance and release. Both move by the same displacement. A drag smaller than 0.1 metre does not commit an edit.
Press Undo to restore their locations. Reselect both if you want to try again.
Shift-click an already selected object to remove it from the group. Click empty space to clear the entire selection.
To practise creating food from scratch, choose Food pickup, click an empty
location, then switch to Select & move and inspect the new pickup: its default
radius is 0.4 metre. Delete this temporary pickup to return to the four-pickup
finished exercise.
A group is a temporary selection, not a new scene object. Applying numeric properties to a group changes only its last member; dragging, duplicating, and deleting operate on every member. If objects overlap, selection chooses the nearest eligible centre. Zoom in or temporarily move an object to reach one underneath.
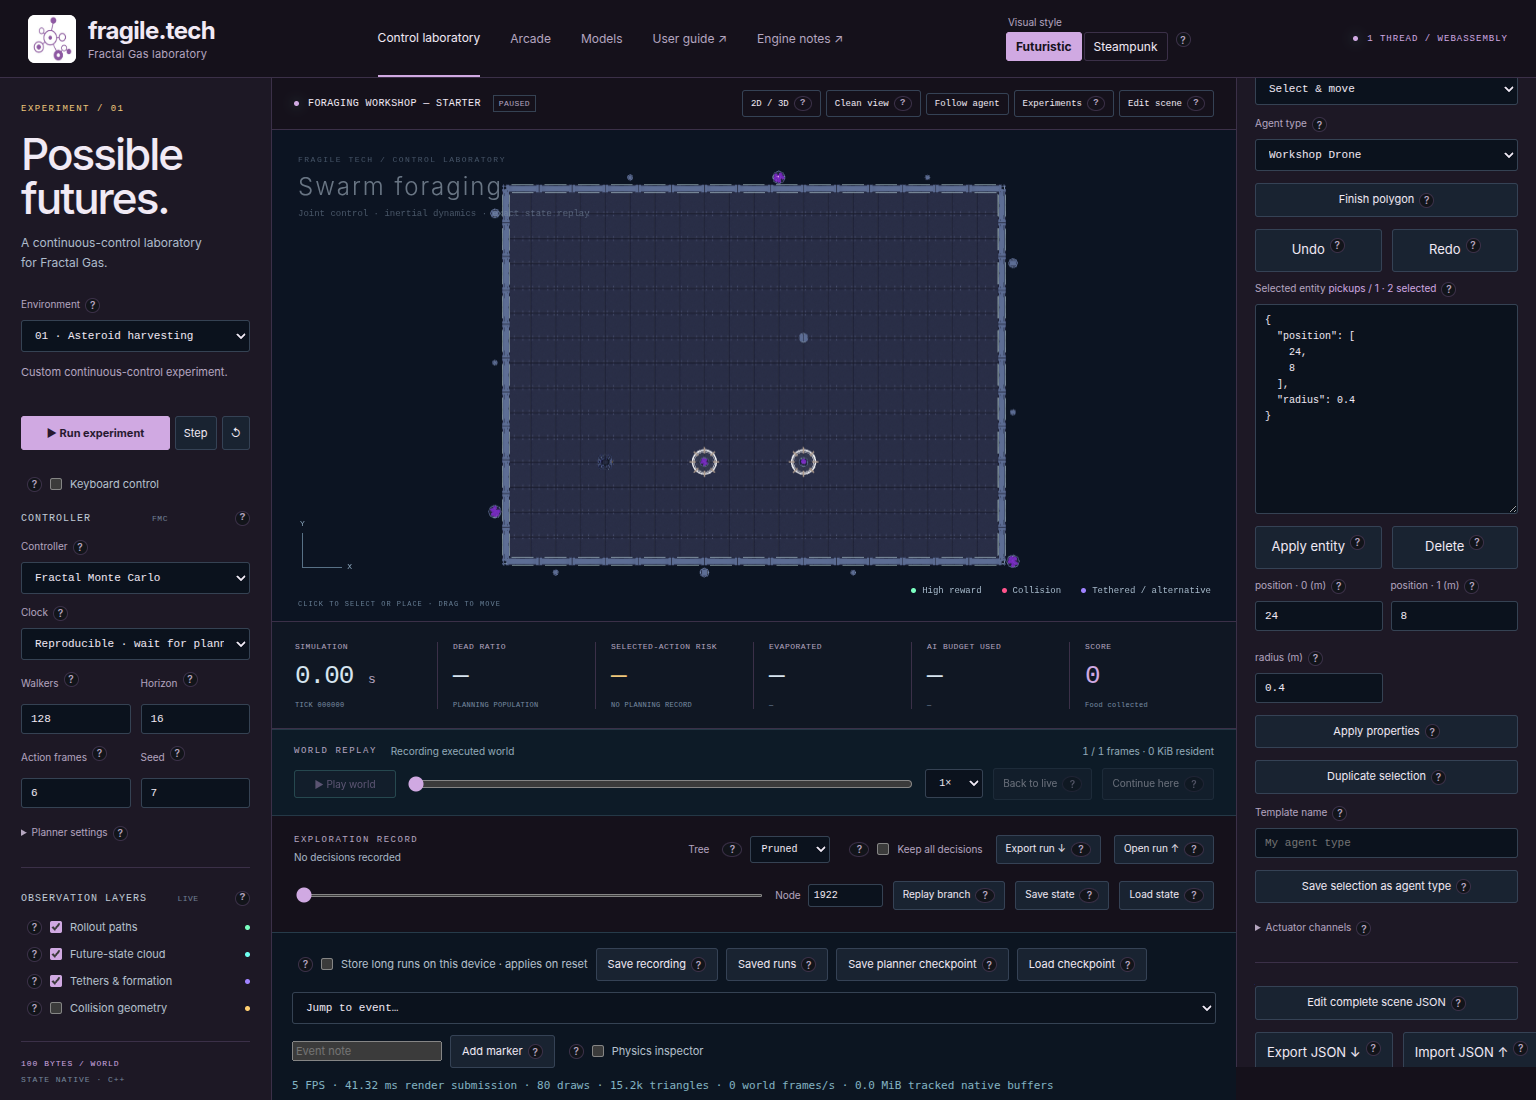
Fig. 27 A group drag preserves relative positions. Check the selection count before deleting or duplicating.#
Add a pickup tank and an unloading refinery#
This optional extension starts from the finished foraging workshop. Its original
JSON has no top-level cargo object, so the drone can collect indefinitely. A tank
introduces a new journey: fill it, return to a refinery, and wait for unloading.
The refinery is a circular zone, like a gate, but its effect is different from a
Delivery base, which accepts physical cargo bodies such as tethered rocks.
Import the finished foraging scene, apply and restart, then enter Edit and choose Unloading refinery in Tool. Click near
[8, 8], then switch back to Select & move. If the drone obscures the refinery’s centre, set the zone’s exact values through complete JSON instead of trying to select through the drone.Open Edit complete scene JSON. Confirm the new
refineriesarray contains one entry, and set it to[{"position": [8, 8], "radius": 2.5}].Add
"cargo": {"capacity": 2, "unload_seconds": 2, "full_reward": 10}as a top-level field, preserving commas. Press Compile scene, then Apply and restart, and wait for the world to load. Adding a refinery alone does not enable tanks; addingcargowithout any refinery fails compilation.Select the drone. Its readout should show cargo
0.0 / 2and Collecting. Drive it to two pickups. Each pickup adds one unit; reaching two switches the phase to Return / unload and awards the configured full-tank bonus.Return the drone’s centre inside the refinery circle. Keep simulation advancing there for two seconds to empty a full tank. In continuous Drive, releasing every key leaves physics running under neutral input. Keep the vehicle inside the refinery while it unloads, or use paused zero-input action frames. At the workshop’s 1/60-second frame duration, two seconds is about 120 frames.
Inspect delivered units increasing during unloading. A completed load counts only when the tank becomes empty. The drone then returns to Collecting and can pick up food again. Export under a new filename to retain this optional variant; the supplied finished foraging download remains the no-tank exercise.
Only full tanks begin the return phase. Visiting a refinery with a partly filled
collecting tank does not unload it. Once returning, leaving a refinery pauses the
unloading but does not resume collection; finish unloading at any refinery. The
unloading rate is capacity divided by unload_seconds per simulation second. The
engine also awards rewards.delivery proportionally to the fraction of a full tank
unloaded; that reward is distinct from both pickup count and completed-load count.
Refineries support selection, numeric position/radius edits, group moves, duplication,
and deletion just like other zones. Deleting the final refinery while top-level
cargo remains enabled makes the scene invalid. Remove the cargo field as part
of the same complete JSON edit if you intend to disable the tank mechanic. Selecting
a passive body displays Select a collecting vehicle; select the drone or clear
the selection to inspect a controlled vehicle’s load.
Edit properties and manage revisions#
Select an entity and begin with its structured numeric properties. They show resolved values, including an agent type’s defaults; Apply properties writes the displayed values into the scene draft. Expand Advanced entity JSON for Selected entity, which contains that one entity’s JSON; Apply entity replaces that object in the draft. With multiple entities selected, these two operations still affect only the last selected one.
Numeric properties recurse through nested objects and arrays, including actuator
parameters. They show units for position (m), velocity (m/s), angle and steering limit
(rad), mass (kg), thrust (N), torque (N·m), spring stiffness (N/m), and damping
(N·s/m). Values must be finite. A blank field is an error, not a request to use a default. Enter a number in every displayed field before applying. Native compilation applies the physical range checks.
Strings, booleans, adding new fields, and collision vertices require JSON editing.
For example, change controlled, cargo, an actuator’s kind, or a visual model name
in JSON. The numeric editor is not a complete scene schema.
Collaborative mining and Asteroid harvesting both default to
keep_delivered_rocks: true and use the same native delivery rule: entering the
inner half-radius detaches all towing hooks and retains the rock. It remains
active, collidable, and free to move; delivery does not physically freeze it.
The rock is excluded from hooking and approach rewards until strictly outside
all outer delivery zones. Mining’s base is at [12, 32], with outer radius 3
and inner delivery radius 1.5.
Turn Keep delivered rocks off and press Apply and restart to restore
full-radius delivery; cargo with respawn: true then respawns at a seeded random
clear position with zero velocity and detached tethers.
Collaborative mining uses one 0.24 kg rock with drag: 0.8, 24 N of thrust per
rocket (48 N combined), and lethal_walls: false. Its controller_defaults use
horizon 64, frames 6, and elites 4; solo harvesting remains at 32/6/4.
The longer lookahead helps coupled delivery but does not guarantee success in
every stochastic run. See Collaborative mining: lift and haul a rock together for the task guide.
Duplicate selection offsets copies by +2 m in both coordinates. If both endpoints of a tether are selected bodies, their connecting tether is duplicated with corrected body indices. A tether to an unselected body is not copied. Delete removes every selected entity, removes tethers attached to deleted bodies, and remaps remaining body indices. Removing or reordering gates also changes their visitation sequence.
Undo and Redo move through draft scene definitions without recompiling physics. The editor keeps up to 40 previous scene revisions; a new edit clears the redo branch. They do not rewind executed motion. Apply and restart commits the resulting draft. With no pending edits, Restart resets the active scene using its active seed; it does not reload the shipped preset. Choose the preset in Environment and apply it to reload its file.
Read numeric fields and units#
The field path tells you where a number lives. position · 0 is x and
position · 1 is y; actuator · steering limit belongs to the nested actuator
object. Numbers inside arrays are editable too, except the body’s collision
vertices, which must be edited as JSON. Only numbers already present in the
resolved entity appear: to add a missing option such as restitution, first add it
to Selected entity, apply, and reselect.
Units below describe the physics. Some less common fields do not display a unit suffix in the interface. A visual scale is dimensionless and changes drawing size; it does not change the collision radius. The complete bounds and built-in extension fields are in Scene JSON reference.
Field |
Unit |
What changing it means |
|---|---|---|
|
m |
Initial centre for bodies and zones; well location for gravity. |
|
m/s |
Initial world-axis velocity; use JSON to add the array when absent. |
|
rad, rad/s |
Initial heading and spin; angle zero points along positive x. π/2 is approximately |
|
kg, kg·m² |
Resistance to linear and angular acceleration. Inertia defaults to a value computed from the mass and hull. |
|
m |
Body collision-circle radius or zone radius. A body with |
|
N, N·m |
Force and turning scales used by built-in actuators; action-channel values scale the available input. |
|
1/s |
Linear and angular damping; larger values shed motion faster. |
|
dimensionless |
Bounce and contact friction. Restitution is limited to 0–1; friction to 0–2. |
|
m³/s², m |
Gravity attraction strength and smoothing distance. Negative strength repels. |
|
m, rad |
Kart turning geometry and maximum steering angle. |
|
1/s |
Kart sideways-slip damping and response toward the requested turning rate. |
|
m/s² |
Kart braking strength. |
|
dimensionless |
Rendered model size only. Compare against Collision geometry. |
Tether |
m |
Relaxed length and automatic attachment distance; edit complete scene JSON. |
Tether |
N/m, N·s/m, N |
Stretch response, relative-motion damping, and break threshold; edit complete scene JSON. |
|
s |
Frame duration and pickup replacement delay; edit complete scene JSON. |
Top-level |
pickups |
Integer tank capacity per controlled vehicle; default 5, range 1–10000. |
Top-level |
s |
Time to empty a full tank while inside a refinery; default 2, range 0.01–10000. |
Top-level |
reward units |
Bonus when a tank first becomes full; defaults to |
Exercise 2: assemble a cargo-delivery course#
Download the cargo starter
and the finished example.
The starter already places a rocket at [8, 15], a 3 kg rock at [13, 15], and a
base at [32, 15] with radius 3. Begin with known positions so that the tether’s
length has a clear meaning. The course exercises a fixed tether; automatic hooking
in the harvesting presets is a separate configuration.
Import the starter, apply and restart, and enter Edit after the world loads. Importing restores the whole-arena camera; choose a top-down view. If you later enable following, press Whole arena to return. Keep the world at its initial state while constructing the course.
To practise the Asteroid placement tool, place a temporary rock in empty space. Switch to Select & move, select it, and inspect its six-vertex hull and mass
3in Selected entity. Delete it. The original two bodies remain.Repeat with Delivery base. Its placement radius is
2.5; select it and change the radius to3with Apply properties. Reselect and delete this temporary base. The course should still have only the original base at[32, 15].Choose Tether · click source, then cargo. Click the rocket centre, then the rock centre. They must be distinct bodies. A spring now connects them. Open Edit complete scene JSON and set the tether’s
rest_lengthto5,stiffnessto25, anddampingto6; confirmais0andbis1. Press Compile scene to update the draft; continue constructing before restarting.Choose Gravity well and click near
[20, 25]. Switch back to Select & move, select the well, and set position to[20, 25], strength to5, and softening to3. Apply. This is a gentle attraction above the direct delivery line; it acts during simulation, not while the world is paused.Choose Draw hole / pillar. Click around a small rectangle near the lower middle of the arena, in perimeter order, then press Finish polygon. Do not click diagonally between opposite corners: that makes a crossing ring.
For exact geometry, open complete JSON and replace
holeswith[[[19,3],[22,3],[22,6],[19,6]]]. Compile. The nested arrays mean a list of holes, each of which is a list of vertices. This hole stays away from both initial bodies.Choose Draw outer boundary and click four corners just inside the arena, enclosing every body, zone, and the new hole. Finish the polygon. Then use complete JSON to set
boundaryto[[1,1],[39,1],[39,29],[1,29]]and compile. This replaces the outside wall; it does not append a second outside wall.Follow the template exercise below to save workshop_tug, press Apply and restart, then export the active scene through Save / Open. The finished download contains the same two bodies, one fixed tether, one gravity well, one hole, one base, and the saved type.
To test the mechanics, enter Drive, select the rocket, and set its thrust to
1with torque at0, and apply several frames. The spring initially has its rest length; as the rocket moves toward the rock, contact and spring forces affect the pair. Reset before trying a longer flight. Use the planner or keyboard to transport cargo into the base and inspect the delivery counter; success depends on your actions, not on merely adding a tether.
The cargo has no respawn: true field, so this exercise is a single delivery. To
repeat delivery with the same cargo automatically, add that
boolean to the cargo entity, leave keep_delivered_rocks disabled, and apply.
The body will then use seeded random respawn with zero velocity and detached
tethers. A fixed tether is not an automatic reattachment rule; use the
automatic-tether fields in the reference for a repeatable harvesting setup.
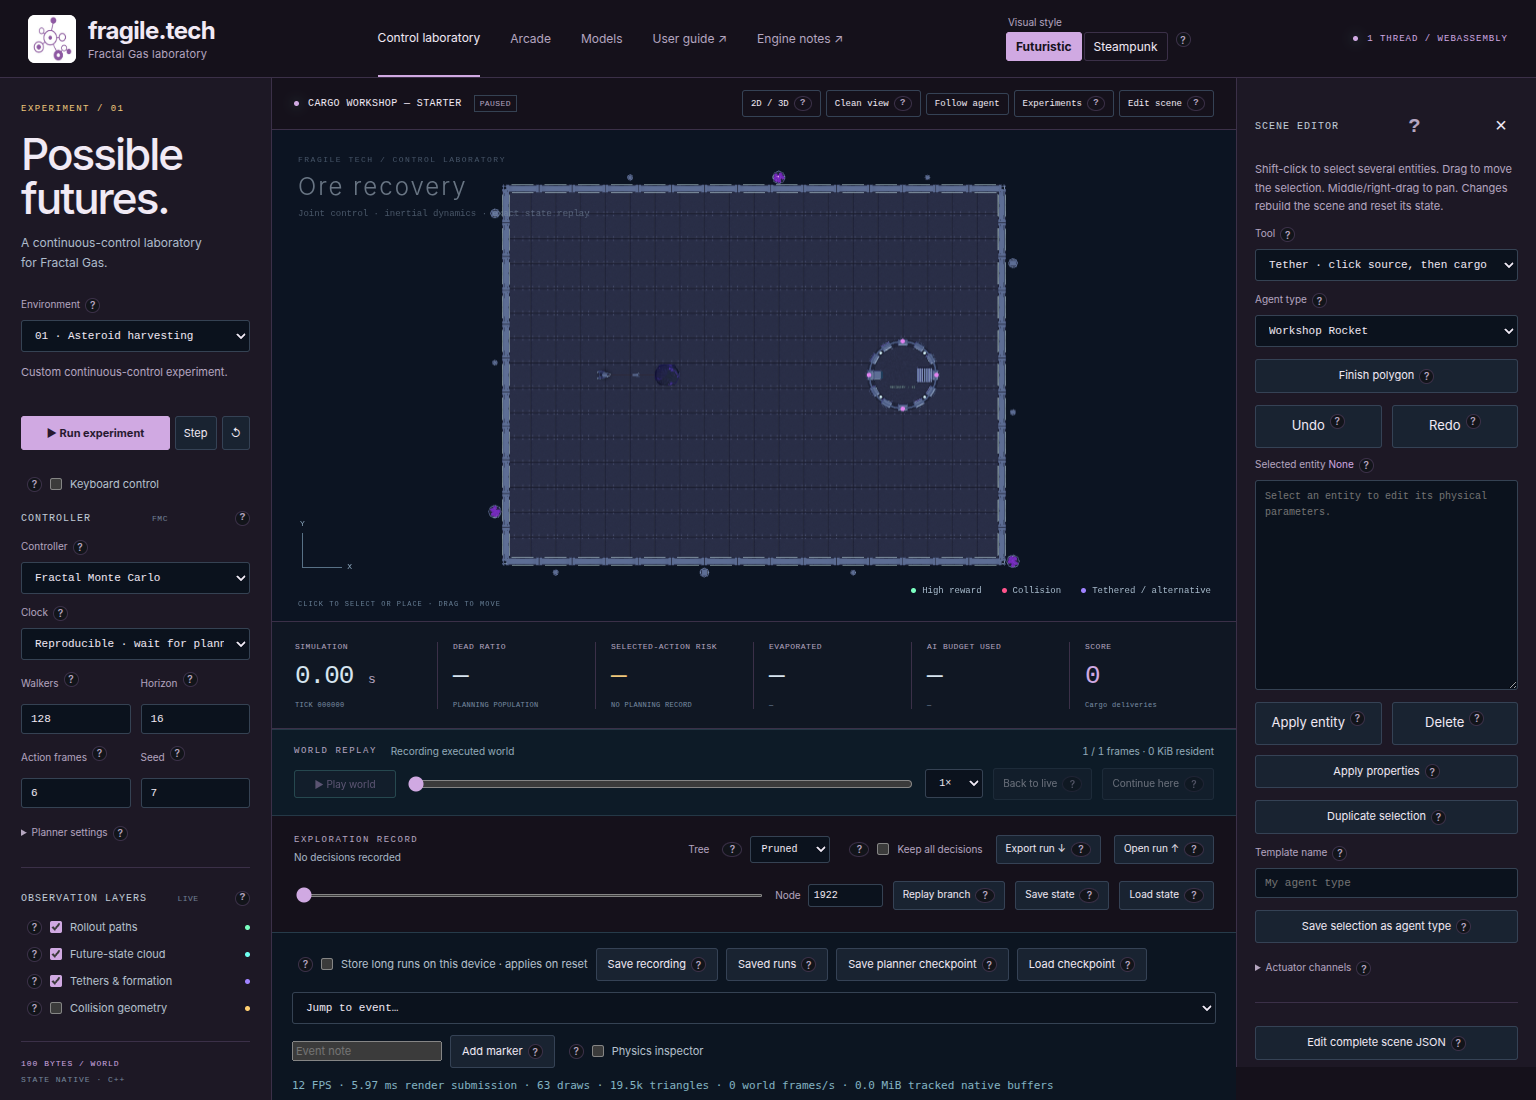
Fig. 28 The tether endpoints are body indices in complete JSON. Selecting the line does not open a tether property panel.#
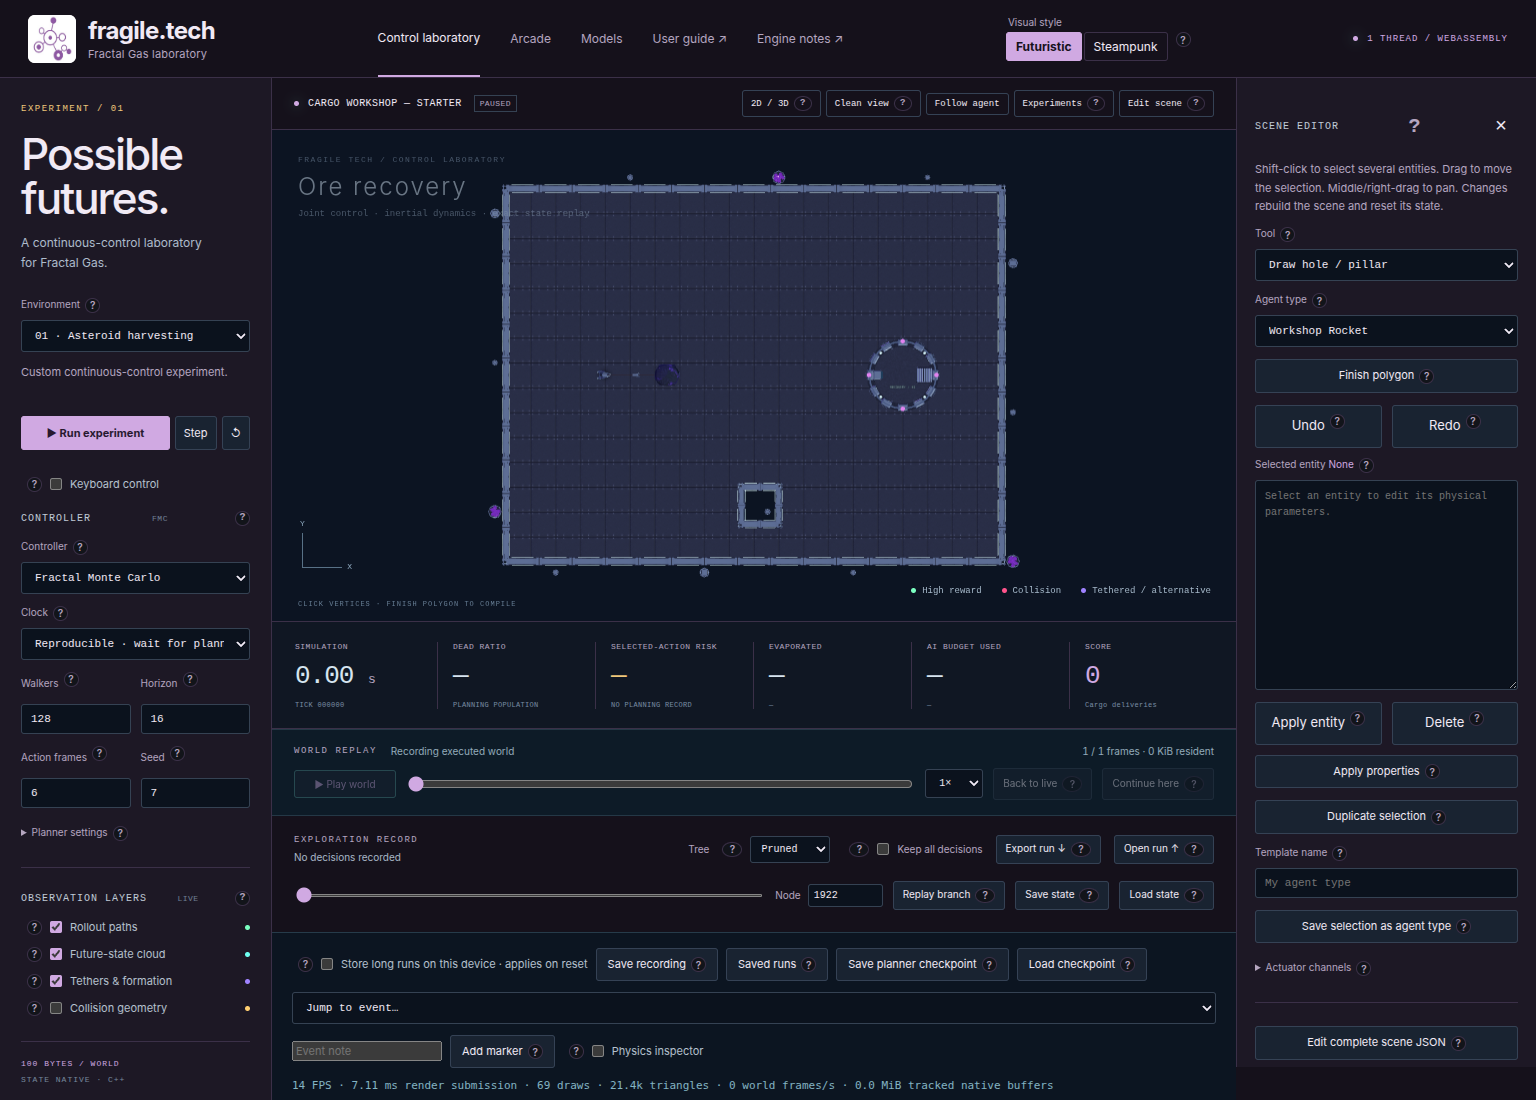
Fig. 29 After Finish polygon, the hole appears in the draft. Apply and restart compiles it into a physical boundary. Keep its edges separate from the outer wall and other holes.#
Define reusable agents and test their actuators#
The supplied scenes carry an agent_types catalog. Agent type offers the Kestrel
vector rocket, Mite electric kart, Wisp holonomic drone, and Kestrel independent
thrusters, plus any scene-specific types such as the racing kart. A type contains
physics and visual defaults. A body’s agent_type selects them; fields on that
body override the defaults. A type’s extends names another type in the same scene.
The compiler rejects unknown types and inheritance cycles.
Select a body, enter a unique Template name, and press Save selection as agent
type. The editor saves its resolved physical and visual configuration in this
scene’s catalog, omitting its starting position, linear velocity, and angle. An explicit omega (initial angular velocity) is retained, so remove it if the new type should start without spin. The existing
body remains as it was. Select the new type and use Agent to place another copy.
Apply and restart, then export JSON to preserve the template. Saving it does not
update the shared catalog file or other presets.
Overrides are shallow. Replacing actuator replaces that entire nested object, and
replacing a hull or thruster array replaces the whole array. When customizing a kart,
include every actuator setting you intend to preserve. Applying numeric properties
also writes inherited values onto the instance; later changes to the template will
not override those explicit instance values.
Save and place a reusable tug#
In the cargo course, choose Select & move and click the rocket. The selection label must read
bodies / 0, not a base or well.Enter
workshop_tugin Template name and press Save selection as agent type. Saving updates the scene draft; the active world remains paused.Choose workshop_tug in Agent type, choose the Agent tool, and click an empty starting location. The new body has the saved actuator and appearance.
Choose Select & move, select the new tug, and inspect its
agent_typefield. Change its numeric mass to2and apply. This writes an override on that body; the original rocket still has mass1.Reselect and delete this temporary second tug to match the finished cargo file. The saved type remains in Agent type. Apply and restart before exporting the active scene to retain it.
To change an existing body’s type, edit its agent_type string in Selected entity
and apply. Changing the dropdown alone only affects future placements. Explicit
instance fields win over the new type’s defaults: remove an instance’s old mass
or actuator override in JSON if you intend to inherit those fields again.
The numeric editor writes resolved defaults back onto an instance. For a change that
should affect every kart using a type, edit agent_types in complete scene JSON,
then remove conflicting body overrides. Keep the complete nested actuator object
when replacing it. A partial nested override does not merge missing settings from
the type; omitted settings may instead fall back to the actuator compiler defaults.
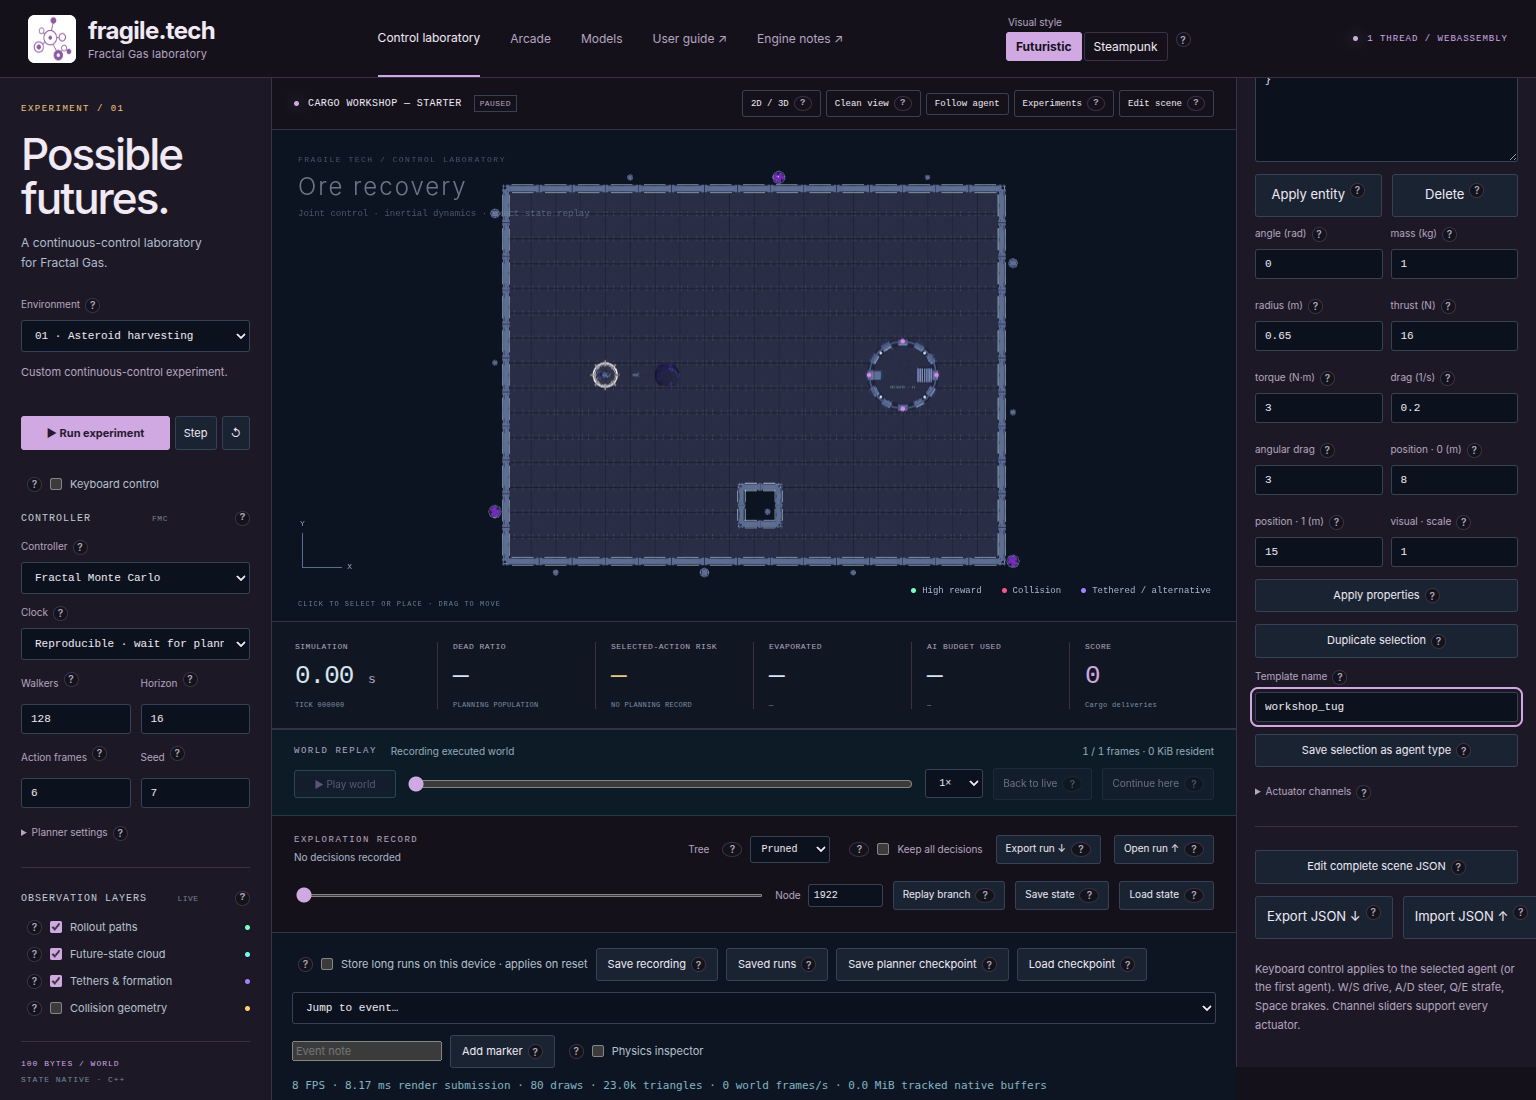
Fig. 30 Saving a template adds a portable scene-local type. Place a new body with Agent to use it.#
Actions without a planner#
Enter Drive to see the selected controlled vehicle’s actuator sliders and supported keys in the inspector. The same body selection is used by Inspect, camera following, and action guides. With no controlled vehicle selected, the controls use the first controlled body. Apply pending scene changes before testing the new machine: the active engine still has the old actuator definitions until Apply and restart succeeds.
While paused, set the sliders and press Apply action · 1 frame or Step physics frame. To advance continuously, press Start driving. The worker advances fixed physics frames independently of key-repeat events; releasing the keys restores neutral input while the vehicle can coast or fall. Pause stops the world. Losing focus, hiding the tab, opening a modal, or leaving Drive also pauses execution and clears commands.
W/S map to thrust, throttle, or body-local x force; A/D map to torque or
steering; Q/E map to body-local y force; Space maps to brake. Values are
clamped to channel bounds: S cannot reverse a forward-only vector rocket.
Independent thruster_0, thruster_1, and similar channels require the sliders.
Unknown custom channel names also need sliders or a custom keyboard mapping.
Pointer-operated buttons provide the supported controls on touch screens.
Keyboard input is ignored while an input, text area, or select element has focus.
To drive from a replay frame, first use Create run from this frame.
Actuator kind |
Channel and native slider range |
Keyboard input |
|---|---|---|
|
|
W gives forward thrust; A/D give positive/negative torque. S clamps to zero thrust. |
|
|
W/S give forward/reverse throttle; A/D give positive/negative steering; Space applies brake. |
|
|
W/S drive along the body’s local x axis; Q/E along local y; A/D turn. |
|
|
Use the individual sliders in the live Lab. |
Registered custom actuator |
Compiled channel names and bounds define the sliders. |
Known names receive the mappings above; otherwise use sliders. |
Action values are normalized commands, not newtons. A vector rocket with thrust
16 N and a thrust slider at 0.5 requests 8 N along its current heading.
Changing the action does not edit that maximum force. To change the machine, edit
its properties; to test the machine, change its action. Slider positions initialize
to zero clamped to each channel’s native bounds whenever a scene reloads.
Exercise 3: build and drive a kart route#
Download the kart starter
and the finished example.
This is an open checkpoint workshop, not a decorated racing circuit. The starter
has a kart at [8, 12], facing positive x, and two separated gates. The finished
route has four gates around a rectangle. Keep the gates separated: a route whose
next gate overlaps the current gate can award progress without a useful journey.
Import the starter, apply and restart, then enter Edit and select the kart with Select & move. Read its inherited actuator numbers: wheelbase
1, steering limit0.6, lateral grip14, yaw response8, and brake deceleration18. Its three channels are throttle, steering, and brake.To change the shared kart type, open Edit complete scene JSON. Under
agent_types.workshop_kart.physics.actuator, changesteering_limitto0.5, leaving the other actuator fields intact. Press Compile scene to update the draft. Reselect the kart and verify the new inherited value. This matches the finished file. As an optional comparison, change the numeric field on the instance and apply: that creates an instance override instead.Choose Checkpoint gate, click near
[8, 22], then use Select & move to select the new gate. Set position to[8, 22]and radius to2; apply.Place another gate near
[8, 12]. The kart overlaps that position, so selecting the gate by its centre may select the kart. Use complete JSON to set the last gate’s position to[8, 12]and radius to2, preserving the preceding entries. Confirm the ordered positions are[24,12],[24,22],[8,22],[8,12].In the same complete JSON draft, set the presentation and evaluation objects to the fragment below, then compile. These are top-level fields alongside
bodiesandgates; do not paste them inside an individual gate.
"presentation": {
  "task_label": "Kart workshop",
  "score": {"metric": "gates", "label": "Gates crossed"}
},
"evaluation": {"metric": "gates", "target": 4}
The fragment is not a complete JSON document. Insert it between fields with correct commas, or import the finished download to inspect its complete syntax. After Apply and restart, the score label describes gate count. The evaluation target gives experiment batches a four-gate success criterion; it does not terminate ordinary live play.
Press Apply and restart, enter Drive, and select the kart. Set throttle to
1, steering to0, and brake to0; click Apply action · 1 frame several times. The kart accelerates toward the first gate. Set throttle to0and apply more frames to observe coasting and drag. Set brake to1to compare braking. Restore all sliders to0and reset the scene before the keyboard test.In Drive, press Start driving and click the world away from a form field. Hold W for a short forward burst; use A/D while moving to turn; hold Space to brake. Use S for reverse throttle. Start with small bursts so there is room to slow down before the first gate. Releasing every key returns to neutral input while coasting continues. Press Pause when you want physics to stop.
Approach the highlighted first gate at
[24, 12]. Its count increases when the kart centre enters the circular zone. The next target becomes[24, 22]. Visit all four in order; entering gate 4 at the initial position does not skip gates 1–3. Decorative arches are not additional collision or timing conditions.Return to Inspect, choose a controller, apply any pending changes, and press Restart and Run to compare planned driving. Stop before editing. Export the scene, import it again, and apply and restart: the kart starts at
[8, 12]with gate count reset. Save a run archive separately if you want to preserve the motion, using Record, replay, and continue experiments.
A kart needs forward or reverse motion to make a steering input into a useful turn. Its actuator is different from a rocket’s torque channel, which can rotate a body without driving along a track. If the kart does not turn while stationary, first apply modest throttle. Try changing one actuator number per run: a lower steering limit reduces the largest requested steering angle; greater lateral grip removes sideways slip faster. Reset between comparisons and retain the same starting scene.
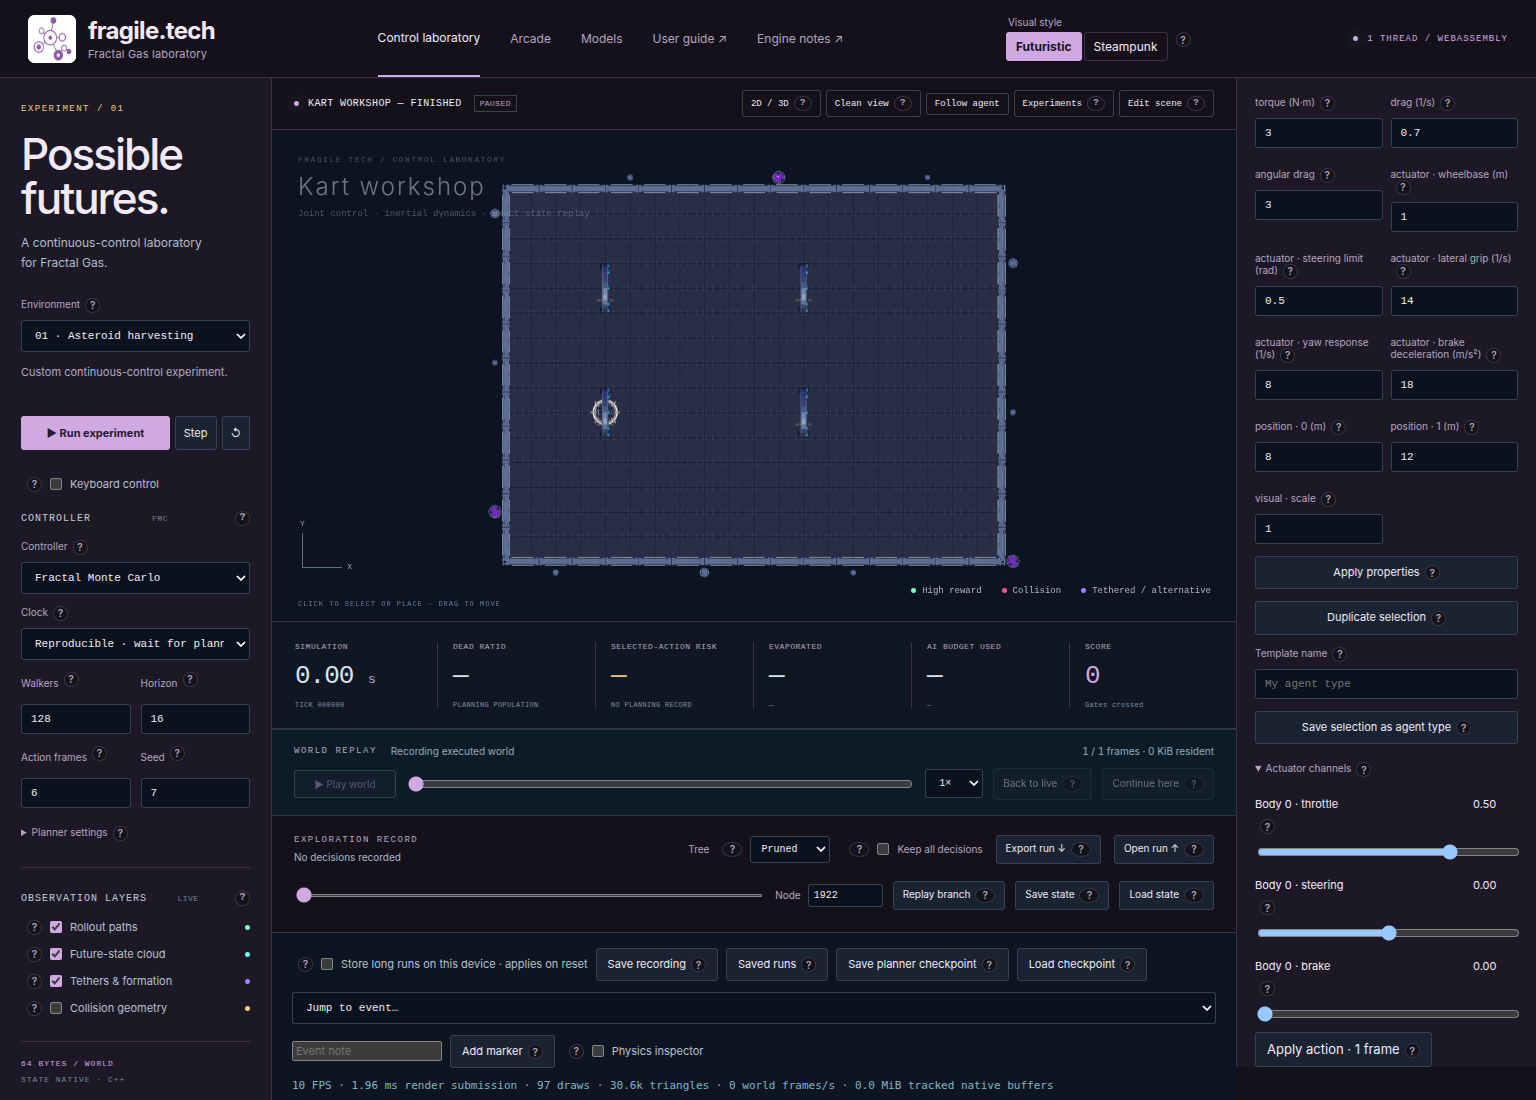
Fig. 31 The Drive inspector exposes the selected vehicle’s commands. The editor’s advanced actuator panel retains its joint-action sliders.#
Import, export, and compile a complete scene#
Open Save / Open for scene import and export. Export JSON ↓ saves the active scene definition, including applied templates and edits. Apply pending changes first if you want them in the file. Scene JSON does not save current body poses or recorded motion. Import JSON ↑ reads a complete scene file into the draft; close Save / Open and press Apply and restart to load it.
Edit complete scene JSON opens the draft definition; Compile scene parses that text back into the draft. The scene must contain at least one body. Native geometry, physical-parameter, actuator, and reference checks happen when you press Apply and restart. Inspect the status for asynchronous errors. Failed preparation retains the original paused world and proposed scene; correct the draft, undo the edit, discard it, or import a known-good download. A failed device save also retains the current run and offers Retry, Export, Cancel, and an explicit Continue without saving choice.
A scene file and a world snapshot solve different problems. The JSON builds the
laboratory; a .fgcs snapshot restores a compatible world’s mutable state. Editing
the scene changes snapshot compatibility. Use run archives when you need scene,
settings, and recorded motion together; see Record, replay, and continue experiments.
Here is a complete small kart scene. Paste it into the complete JSON editor, press
Compile scene, then Apply and restart. Enter Drive and use the controls to approach the gate at [24, 12]. The omitted
boundary defaults to the rectangular size. This example supplies its own type,
so it does not depend on whichever preset you had open.
{
  "version": 1,
  "name": "Kart workshop",
  "task": "navigation",
  "size": [32, 24],
  "physics": {"dt": 0.016666666666666666, "lethal_walls": false},
  "agent_types": {
    "workshop_kart": {
      "label": "Workshop kart",
      "physics": {
        "controlled": true,
        "radius": 0.65,
        "mass": 1,
        "thrust": 12,
        "drag": 0.7,
        "actuator": {
          "kind": "kart",
          "wheelbase": 1,
          "steering_limit": 0.6,
          "lateral_grip": 14,
          "brake_deceleration": 18
        }
      },
      "visual": {"model": "kart", "color": "#c69bd9", "scale": 1}
    }
  },
  "bodies": [{"agent_type": "workshop_kart", "position": [8, 12], "angle": 0}],
  "gates": [{"position": [24, 12], "radius": 2}],
  "evaluation": {"metric": "gates", "target": 1}
}
With only one gate, remaining inside it earns another gate count on each frame. Use several separated gates for an ordered route. The example is an actuator workshop, not a lap-counting circuit.
Edit a complete JSON draft safely#
Use Scene JSON reference when you need a field not shown in the numeric panel. It covers every supported built-in scene option, defaults and bounds, actuator configuration, presentation, evaluation, and extension configuration.
Export a working scene before a large change. This preserves geometry and definitions even if the browser tab closes; Undo exists only in this session.
Open Edit complete scene JSON. Locate the containing object or array first:
bodiesholds initial bodies,gatesholds ordered checkpoints,agent_typesholds reusable types, andphysicsholds world integration parameters.refineriesholds tank-unloading zones; top-levelcargoenables the collection-and-unloading cycle for controlled vehicles.Edit one feature at a time. Use JSON double quotes, lowercase
true/false, commas between entries, and no comments or trailing comma. Keep at least one body. Arrays of positions use exactly two coordinates.Press Compile scene to stage the JSON, then Apply and restart. Wait for the world to become ready and inspect status. Closing the JSON dialog alone does not validate native physics or replace the active world.
Select the affected entity, inspect its resolved numeric properties, then enter Drive and apply a few manual action frames. If you changed a hull, enable Collision geometry to check the physical shape against the visual model.
Export the tested result. To reproduce the flight as well as the scene, preserve a run archive; scene JSON always restores initial conditions.
Changing controlled to false removes the body’s actuator channels. Changing a body’s
cargo boolean affects whether it is a deliverable physical body. The top-level
cargo object instead enables pickup tanks on controlled vehicles; their unloading
zones are refineries, not bases. Changing a visual color changes
neither role. To remove a tether, delete its entry from tethers; to remove or
reshape a hole, edit holes. Neither has a selectable entity JSON panel. When
manually reordering bodies, update tether indices yourself. The toolbar’s Delete
and Duplicate operations do that bookkeeping for you.
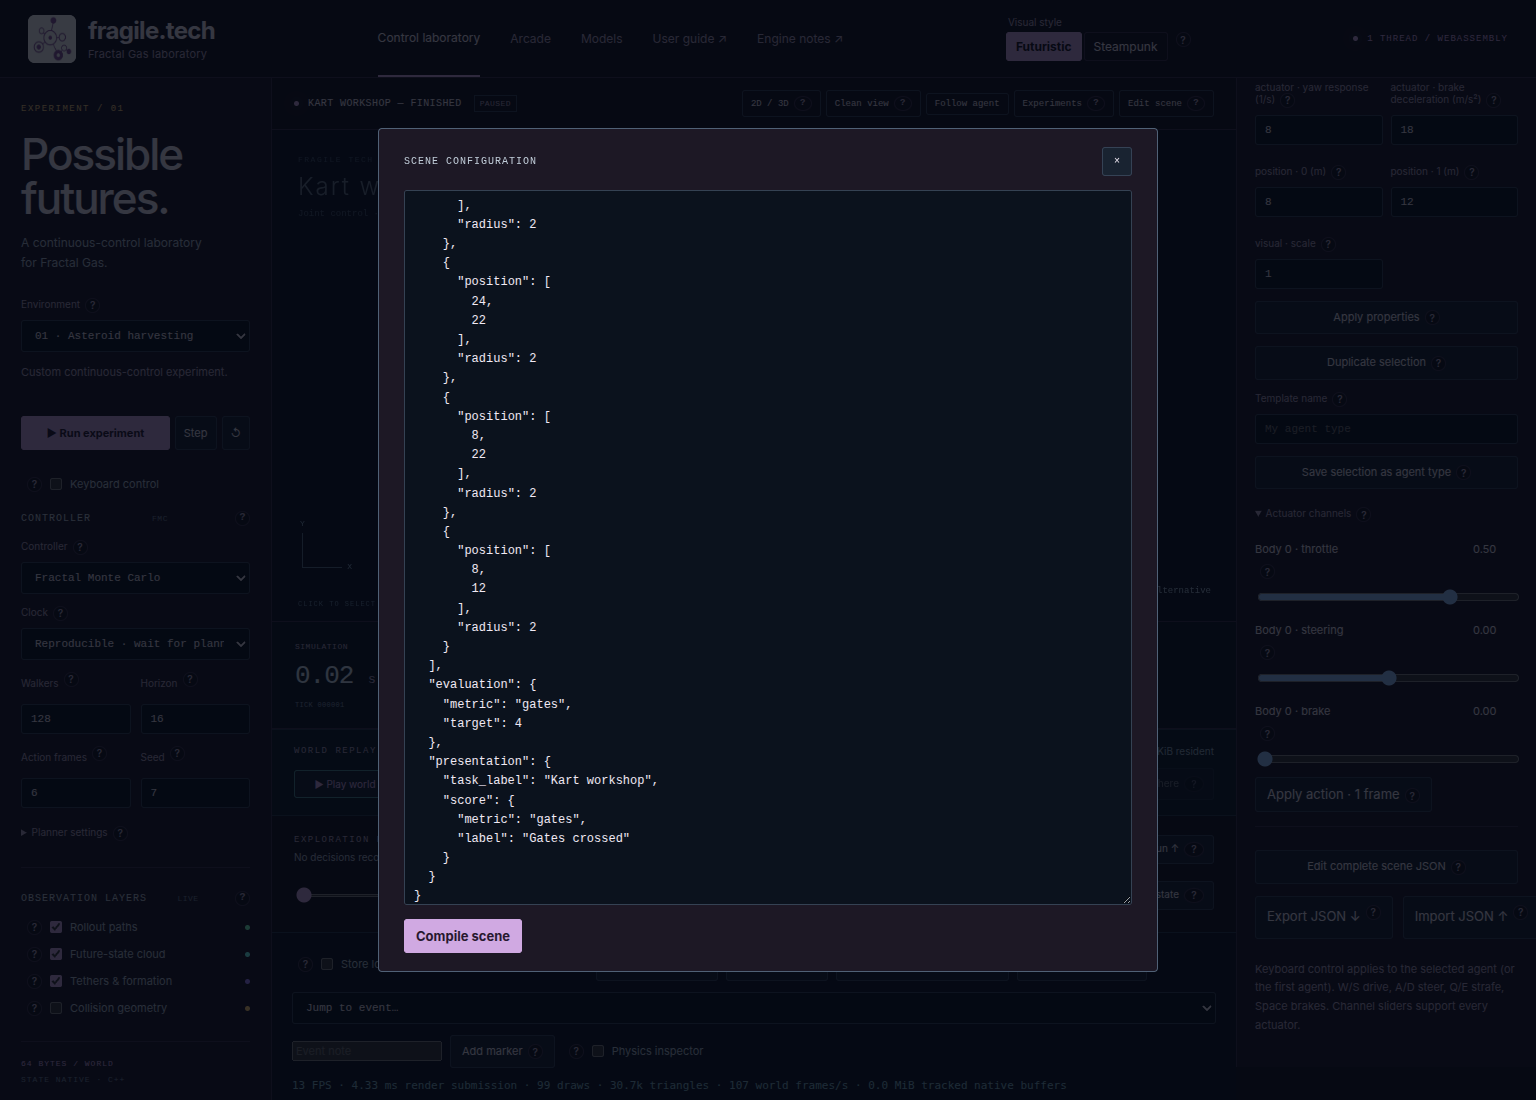
Fig. 32 The complete editor reaches world geometry, type catalogs, task rules, and metadata as well as bodies.#
Recover from mistakes#
A failed edit is a useful diagnostic if you know which layer rejected it. JSON syntax fails before a world can be built. A valid JSON object can still describe an invalid physical scene. Fix the earliest reported problem, stage the corrected JSON, and apply and restart before testing the changed machine.
For a reversible practice error, open the complete editor and delete a comma between
two fields. Press Compile scene: the dialog reports the parse error. Put the
comma back and compile. For a native validation example, export a working scene,
then set a body’s mass to -1, press Compile scene, and Apply and restart.
The native range check rejects it while the original world remains available.
Correct the draft, use Undo, or discard it to restore the active configuration.
Error messages may identify a numeric range rather than the exact field path, which is why one
change at a time is easier to diagnose.
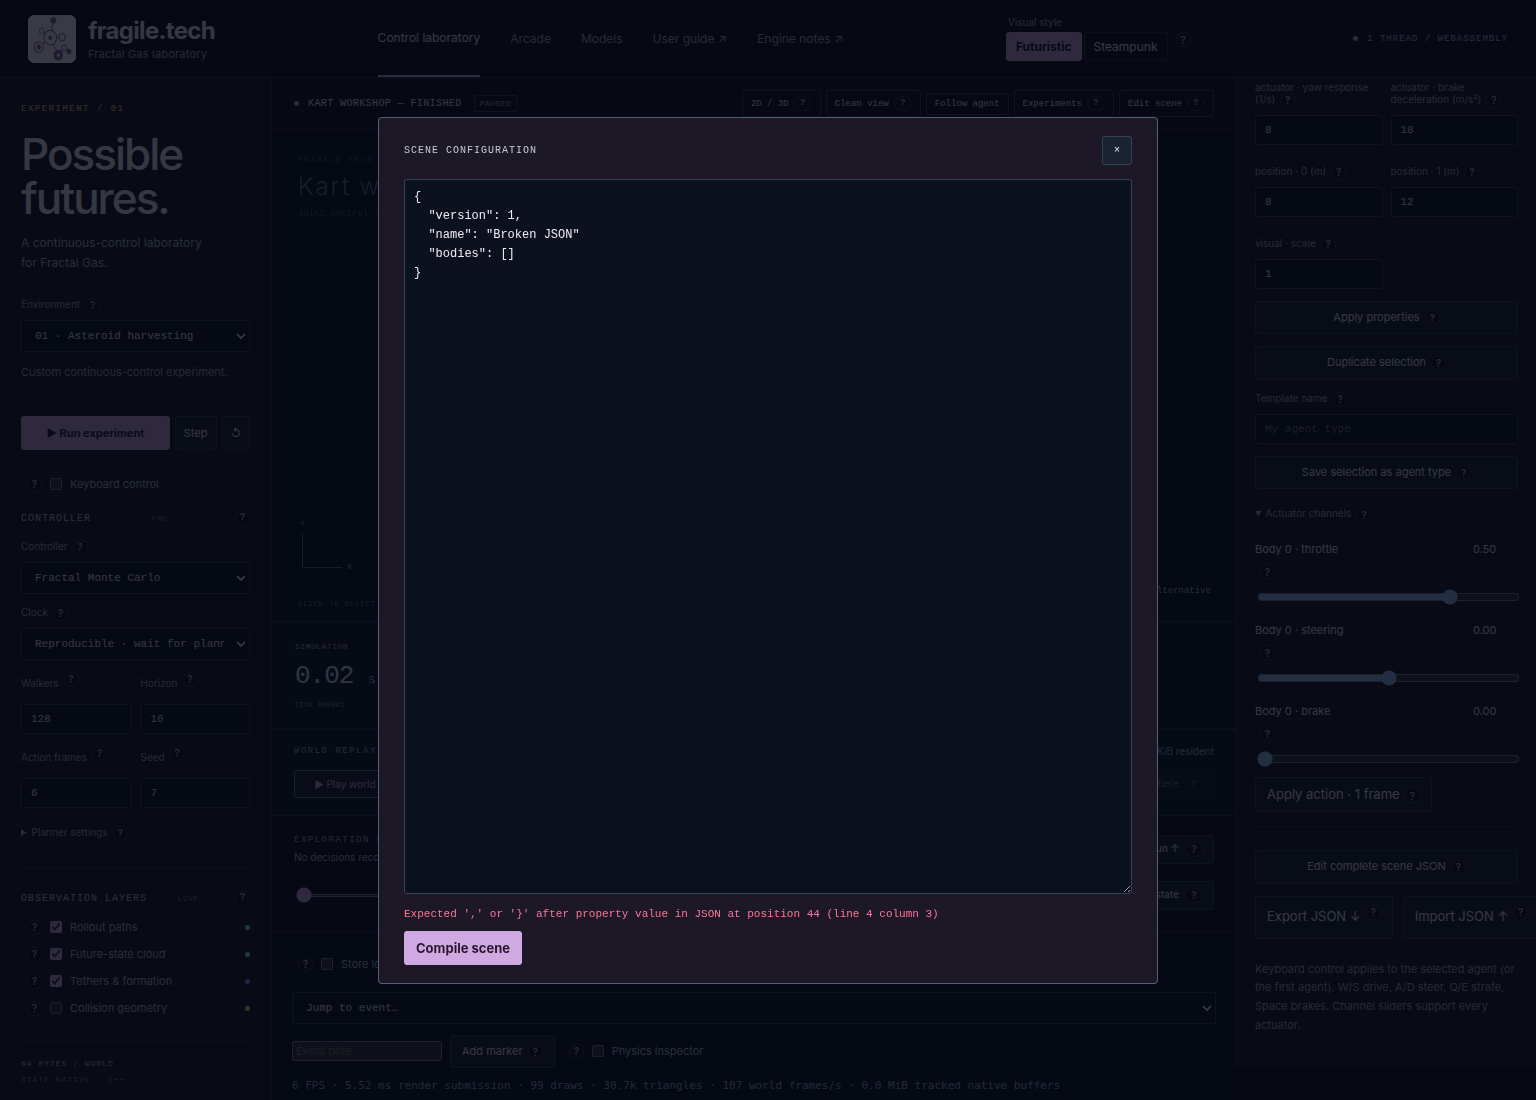
Fig. 33 Syntax errors remain in the dialog. Also inspect the main status area for errors returned by the native compiler.#
Symptom or error |
Cause and recovery |
|---|---|
Selected entity: None after Apply and restart |
The scene reloaded. Choose Select & move, then reselect; ordinary draft property edits retain a valid selection. |
Applying properties changes only one member of a group |
Numeric and entity edits target the last selected member. Reselect and edit each member, or edit the complete arrays. |
Changes typed in JSON disappear after applying numbers |
The text and numeric editors hold separate drafts. Apply one, reselect, then edit the other. |
Nothing happens when typing W/A/S/D |
Enter Drive, press Start driving, take focus out of number/text/select controls, and select a controlled vehicle. |
A passive rock is selected and the rocket will not thrust |
Select the rocket in Inspect or Drive and check the vehicle name and supported channels in the inspector. |
The rocket will not reverse with S |
Its forward-only thrust channel clamps negative input to zero. Turn the rocket or choose another actuator. |
Independent thrusters ignore W/A/S/D |
Use thruster_0, thruster_1, and other sliders; these channels do not have built-in keyboard mappings. |
One frame appears motionless |
At the workshop’s |
Polygon needs at least three vertices |
Click three or more distinct vertices with a polygon tool, then finish. Switching tools discards the unfinished draft. |
Self-intersection, intersecting rings, or nested holes |
Enter perimeter order; remove crossings; keep holes separate and inside the outside boundary. Edit complete JSON for precise vertices. |
Cargo collection requires a refinery zone |
Keep at least one |
Full vehicle stops collecting / partially unloaded tank will not refill |
Expected return phase: enter a refinery and advance simulation until the tank is empty. |
Body/zone outside playable region |
Move its initial centre inside the outside boundary and outside every hole; verify the new boundary still contains existing entities. |
Dynamic hull must be convex |
Use a convex body polygon with at most 32 vertices. Concave room walls are allowed, concave moving-body hulls are not. |
Unknown agent type / cyclic inheritance |
Correct |
Properties must contain finite numbers |
Fill blank fields and remove invalid numeric input. Use real numbers, not unit text or expressions such as |
Numeric range error after compilation |
Restore the last changed physical value and check the reference bounds; mass and radius must be positive. |
Tether cannot join a body to itself / invalid endpoint |
Use distinct valid zero-based body indices. After manual body reordering, update |
Apply and restart reports a bad compile |
The original world is retained. Correct or undo the draft, discard it, or import a known-good starter, then apply again. |
Undo cannot recover an old run |
Undo stores up to 40 scene revisions, not simulation frames. Use the replay/archive tools for motion. |
Visual wall or model disagrees with collision shape |
Check native |
Add a preset and separate appearance from mechanics#
To make an edited scene available in Environment, export it and save the file as
fractal-gas-web/web/lab/scenarios/workshop.json. Append
{"id": "workshop", "label": "Kart workshop"} to scenario-catalog.json in the lab
folder. Keep IDs unique, beginning with a lowercase letter and using only lowercase
letters, digits, underscores, or hyphens. Reload the page to fetch the catalog. The
picker and All preset scenes experiment option use that catalog automatically.
Include an evaluation metric and target when the scene has a useful default success
criterion. presentation can choose score and progress readouts; it does not change
reward or termination behavior.
An agent’s visual.model selects rocket, kart, drone, or the declarative kit.
Color, scale, and kit parts affect appearance. On authored vehicle assets,
visual.color changes a small identification marker beneath the body; it does not
repaint the authored bodywork. Procedural models and kit parts can use color more broadly. Physical radius or convex vertices,
mass, and the actuator determine collisions and motion. Making a model twice as large
does not double its collision hull. Enable Collision geometry to compare them.
Likewise, the angled camera draws a three-dimensional view of planar physics.
The optional environment.kind selects a registered environment renderer (arena
by default, or circuit). Circuit centreline and start decoration belong to this
visual metadata; actual walls still come from boundary and holes, and targets
from gates. If you reshape a circuit, update its decorative guide as well. New
actuators, models, environment renderers, reward logic, and controllers have separate
registration points described in Engine architecture and extension guide. Add behavior at the
appropriate interface so that every planner can continue using the same batch-state
and bounded-action contract.