
Arcade Lab environments#
The Arcade Lab has four buttons, each opening a distinct environment. They are four different machines with four different ideas of what the state of a game is. Mario exposes a little NES machine, Atari exposes the Arcade Learning Environment (ALE), Sonic exposes a Genesis machine, and Montezuma uses ALE again with extra knowledge of that particular game.
The planner still asks every machine the same basic questions: What actions can I take? What happened after I held one for a few frames? How much reward did that produce? Is this walker finished? The answers are where the important differences live. This page is the map of those answers.
Mario / NES#
Mario is the cleanest place to see what a map-aware arcade environment is doing. The NES emulator runs Super Mario Bros directly, while the swarm keeps many complete copies of the game. The map below the screen is a full-level diagnostic drawing alongside the emulator view, with the walkers’ positions painted on top. That lets you see the gas spreading through a level even when the screen follows a single camera window.
Selectors and start state#
Choose Mario, then choose World from 1 through 8 and Stage from 1 through 4. The selectors are the familiar player-facing names; the emulator does the small boot-time RAM operation needed to start directly in that level. Changing either selector restarts the run from a fresh paused state. The bundled Super Mario Bros ROM is loaded for the page; on a deployment that keeps ROMs in the encrypted local vault, unlock it once in the browser.
Mario uses the chosen world and stage as its map selection. Those controls determine both the initial game and the full-level map shown before the first iteration. When walkers later reach other stages, the map follows the leading walker’s current stage.
Mario observations#
In Coords mode, think of the tuple as a pocket notebook carried by Mario. The first entry says how far along the level he is; the next entries say where he is vertically and how he is moving; the remaining entries identify the local area and a few pieces of game state. It is enough to tell “running right on the ground in 1-1” from “falling in a pipe room” while using ten meaningful values in place of 184,320 pixel numbers.
The values are intentionally raw. In particular, the level identifiers are the NES’s RAM values, while the World and Stage controls and the map labels are one-based. Treat the tuple as a compact coordinate chart for distances; its values describe state, while the UI supplies pretty display strings separately.
Coords entry |
Meaning |
|---|---|
|
Mario’s horizontal position in level/world pixels. |
|
Player vertical pixel position on the current screen. |
|
Vertical viewport state used to distinguish normal play from falling/off-screen states. |
|
Raw level identifiers from NES RAM. |
|
The in-game decimal clock. |
|
Signed horizontal and vertical velocity proxies. |
|
The current sub-area/area byte. |
|
The power-up state byte. |
RAM is the 2 KiB NES CPU RAM. RGB is the \(256\times240\) framebuffer, with three values per pixel. Gray is one luminance value per pixel. All three are valid ways to make the swarm compare states, but RGB and Gray are large; Coords is the fast default for this environment.
Mario actions, reward, and termination#
Mario’s action set is a small, intentional vocabulary drawn from useful combinations of controller bits. The swarm can stand still, walk or run left and right, jump, and combine movement with the A/B buttons. Holding an action for several frames is what gives an action its physical meaning; a single “right” choice represents a held movement whose effect unfolds across those frames.
The default reward is shaped toward finishing a level. Each ordinary frame pays for small rightward progress and charges for clock time running down. A large position jump is treated as an emulator transition, and the transition guard protects the reward from a bad RAM read becoming a giant motion reward. Death carries a penalty, and the ordinary per-frame sum is clipped to \([-15,15]\) by default.
In addition to the clipped sum, two bonuses are available. Grabbing the flag pays \(500 once, and entering a newly visited area pays \)100 once. The second rule matters because some useful Mario routes go through a pipe: the player may move into a side room, appear to move backward, and then return much farther along the level. The environment pays the signed skipped distance on that return, so the optimizer keeps the pipe route visible in its search.
Event or term |
Default behavior |
|---|---|
Horizontal progress |
Signed change in level |
Clock |
A decrease in the in-game clock is a penalty. During the flagpole countdown it is treated as forward progress so the swarm can cross into the next level. |
Death |
\(-25\) before the default per-frame clip; the default clip therefore limits the visible one-frame penalty to \(-15\). |
New area |
\(+100\) once per newly visited area in the current stage, including pipe/warp/bonus-room transitions. |
Flag |
\(+500\) once when Mario grabs the flag. |
Termination |
Dying, falling/off-screen, a dead player state, or the game’s lives-exhausted marker. Grabbing the flag alone leaves this wrapper running. |
The flag behavior is a deliberate Lab choice. In the original single-stage interface, the flag ends the episode; here the walker continues through the castle sequence so the finishing route remains available to the swarm as a live branch. A step stops early when one of the actual death/game-over conditions fires, and the NES environment communicates those outcomes through its standard termination result.
The Mario level map#
The Mario map is a static full-level image for every world/stage pair. One map pixel represents one level/world pixel, and the map is 224 pixels high because the 8-pixel top and bottom overscan are left out. Magenta dots are alive walkers, gray dots are dead walkers, and the gold-ringed red dot is the best walker. In Graph mode, thin lines join nodes to their parents, so the picture is also a record of the explored state tree.
The map’s dots come from RAM-derived positions, with computer vision playing a separate role. That is why a dot remains useful even when the game screen is scrolling. Read it as a level-position overlay whose dots track RAM positions; the screen image carries the pixel-level sprite outline.
Generic Atari / ALE#
Generic Atari is the honest baseline: hand the Arcade Learning Environment a ROM, read its machine, and use the score that the game itself reports. Each game has its own meaningful RAM layout. Breakout, Q*bert, and Seaquest place their meaningful state at different addresses, so the environment keeps the representation game-agnostic.
Selector and game identity#
Choose Atari, then choose a game from the Game selector. The default is Ms. Pac-Man. The page bundles a broad list of ALE-supported Atari 2600 games, including Breakout, Montezuma’s Revenge, Pong, Q*bert, and many others. Changing the game loads its ROM and restarts the run.
The World/Stage and Zone/Act selectors belong to the Mario and Sonic modes. A game starts where its own reset starts it. If you choose Montezuma’s Revenge from this generic list, it remains generic Atari: you get generic ALE behavior, generic observation semantics, and raw score reward. The generic Atari display supplies the view; the pyramid map belongs to the dedicated Montezuma mode. Choose the separate Montezuma console button to activate the dedicated logic described below.
Observations and actions#
The default RAM observation is exactly 128 Atari RAM bytes. That is compact, and it functions as machine state; byte 42 might matter in one game and be ordinary scenery state in another. This is the important alias in the UI: Coords is RAM for generic Atari. ALE supplies the same 128-byte vector for every ROM, while each game gives those bytes its own meaning.
RGB and Gray use the current screen returned by ALE. The screen size is game/core data supplied by ALE; the common Atari frames are typically \(160\times210\). Pixel modes make the observation much larger, but they are useful when visual state is the question you want to study.
Actions come from ALE’s minimal action set for the selected game. The set can therefore differ between games, and each ROM gives action index 3 its own button meaning. The planner chooses one of those actions and holds it for the selected frame skip.
Score and termination#
The reward is the game’s own score change, summed over the frames in the action hold. Generic Atari exposes the game’s score delta as its complete reward signal; dedicated designs add game-specific reward terms and generic progress shaping. This is useful precisely because it is plain: if the score rises, the game says that something valuable happened. Raw reward scales belong to each Atari game’s scoring system, so comparisons across games require a fixed game identity or explicit scaling.
ALE life handling needs one careful sentence. A life loss marks that walker done so the swarm directs its next action toward a valid state. If the game still has lives, the death is recoverable and the swarm may revive that walker from a live companion when necessary. The final game over remains a hard death. The soft-death behavior applies to games whose ALE core exposes a life counter.
Item |
Generic ALE behavior |
|---|---|
Reward |
ALE score delta; coordinate, room, and novelty bonuses remain at zero in generic ALE. |
Frame hold |
The selected ALE action is applied for |
Life loss |
|
Game over |
Hard termination; the step ends at game over. |
Truncation |
ALE’s truncation information is kept distinct from the game-over/life-loss |
Map |
Generic Atari presents the current best-walker screen and the reward/alive plots; dedicated map panels belong to the other modes. |
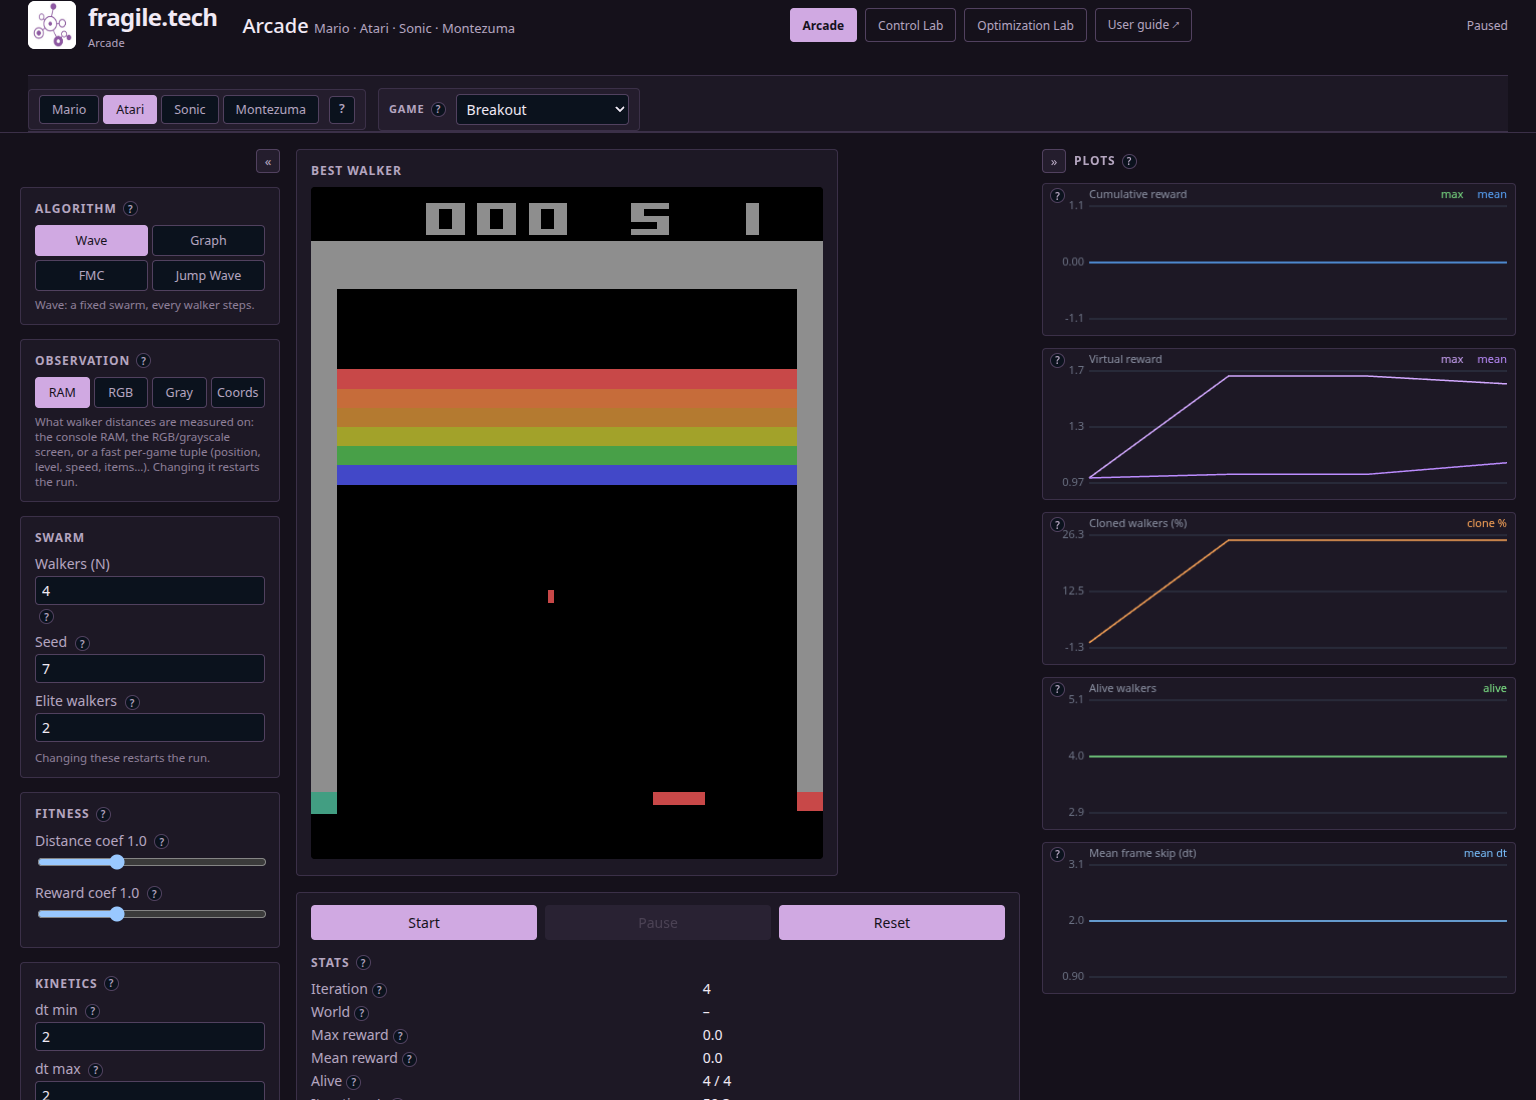
Fig. 36 Breakout is a useful generic-ALE example: the environment can display the game and optimize its score while treating the ROM as a score-driven experiment with game-specific state layout.#
Generic-ALE caveats#
Keep three distinctions in view. First, a generic Atari Coords run is the same
128-byte RAM vector as RAM, so it represents machine memory and keeps player
coordinates game-specific. Second, a life-loss done marks a recoverable game state
when lives remain, so a low alive count can recover on the next iteration. Third,
score meanings differ wildly. A score of 100 in one ROM carries meaning within
that ROM’s scoring system; progress comparisons require the same game and scale.
The emulator instances are restored from complete serialized ALE state, including the emulator’s random state. Sticky actions are disabled in the Lab wrapper. This makes a copied walker a genuine continuation of the copied game state; physical comparisons between different Atari games require separate calibration.
Sonic / Genesis#
Sonic is a different kind of difficulty from Mario. The world is wide, the camera hides most of it, and momentum makes velocity part of the useful state. The Genesis environment therefore records position and momentum in Coords mode, and it builds a second map from what the swarm has actually seen. That second qualification is the whole point of the fog of war.
Zone, act, and ROM selectors#
Choose Sonic, then choose a Zone and Act. The menu offers Green Hill, Marble, Spring Yard, Labyrinth, Star Light, and Scrap Brain, with acts 1 through 3. The menu order is for humans; the ROM uses internal zone identifiers. A small ROM-specific exception is preserved: Scrap Brain Act 3 is loaded through the ROM’s Labyrinth Act 4 slot.
Sonic runs from a local Genesis ROM. The page first looks for a local bundled
sonic.rom; on a hosted build it may unlock the encrypted local copy in the
browser. The Sonic ROM control accepts a .md, .bin, .gen, or .smd file
for a local ROM choice. The uploaded ROM is kept in this browser’s IndexedDB for
later visits through browser-local storage. Replacing the ROM or changing Zone/Act
restarts the run.
Sonic observations#
Sonic’s Coords tuple is designed around reachability. Position tells you where Sonic is, but the velocity entries tell you what kind of future that position can produce: a runner on a ramp, a character in a jump, and a character standing still represent distinct states for reachability. The first five entries are scaled by 256, roughly putting pixels and subpixel speeds into tile-sized numbers. The final entry is a progress label scaled by 100 so changing acts is unmistakable to the distance calculation.
The tuple focuses on motion and progression; score, rings, and lives remain reward variables. Keeping them in the reward channel lets the distance tuple focus on physical state, prevents the reward signal from doing the same job twice, and keeps a high-score but physically identical state close in distance.
Coords entry |
Meaning |
|---|---|
1 |
|
2 |
|
3 |
|
4 |
|
5 |
Ground speed/inertia |
6 |
|
RAM is the 64 KiB Genesis work RAM exposed by the core. RGB and Gray use the \(320\times224\) Genesis frame. Pixel modes show the current camera window, while the full level extends beyond that view.
Sonic actions, reward, and termination#
Sonic has eight actions. The fourth action is Right + Down, which the Lab uses as a rolling action; it gives the Genesis core’s upward/camera-tilt slot a rolling interpretation. Holding B means a higher jump, but a jump requires a button-press edge. Consequently, if one action hold ended with B down, the first frame of the next consecutive B hold releases B before holding it again. This looks like a fussy implementation detail until you see chained planner actions turning one long press into a sequence with zero new jumps.
The default reward has several jobs. Rightward progress pays per pixel, ring changes pay with a signed weight, score changes pay a smaller amount, new 64 by 64 pixel cells pay an exploration bonus once per lineage and act, extra lives pay, boss hit points pay heavily, and entering a later act pays a large clear bonus. The x-progress term pauses while a boss is loaded because the camera is locked there; otherwise the planner would learn to press against a wall and neglect the boss. A jump or a loop can therefore be valuable even when its immediate x coordinate goes backward.
Any life loss ends that walker. Reaching a later act is rewarded while the committed game continues into the next act; life loss remains the terminal event. A step stops early at that life loss.
Reward term |
Default |
|---|---|
Signed x progress |
\(1\) per accepted pixel of change; the transition/glitch guard treats changes larger than 5 pixels in one frame as transitions. |
Rings |
\(+3\) per ring gained and \(-3\) per ring lost; a hit that drops rings is therefore penalized. |
Game score |
\(+0.5\) per score point. |
New exploration cell |
\(+500\) once for a new \(64\times64\) map cell in the walker’s lineage and current act. |
Extra life |
\(+1000\) for a gained life. |
Boss damage |
\(+2000\) per boss hit point removed; Sonic 1 bosses have eight hit points. |
Act clear |
\(+5000\) when the zone/act progress coordinate advances. |
Termination |
Any life loss or a zero-lives state. |
The Sonic fog-of-war map#
The Sonic map is assembled locally from explored camera tiles. Each walker sends back the part of its \(320\times224\) camera frame it saw, downsampled by eight, along with the camera position. The UI stitches those \(40\times28\) tiles into a per-zone/act canvas. Areas awaiting their first camera visit remain dark.
This is a useful picture of exploration, with ground truth extending beyond the revealed region. The map can have holes, and a dark region means “awaiting reveal by this swarm,” while the level can still occupy that region. The fixed Sonic HUD is masked while tiles are stitched, keeping score text separate from platform geometry. Magenta and gray walker dots, the gold best-walker marker, and Graph parent lines are drawn on top of the revealed map. The zoom buttons are there because a long level quickly becomes wider than the panel.
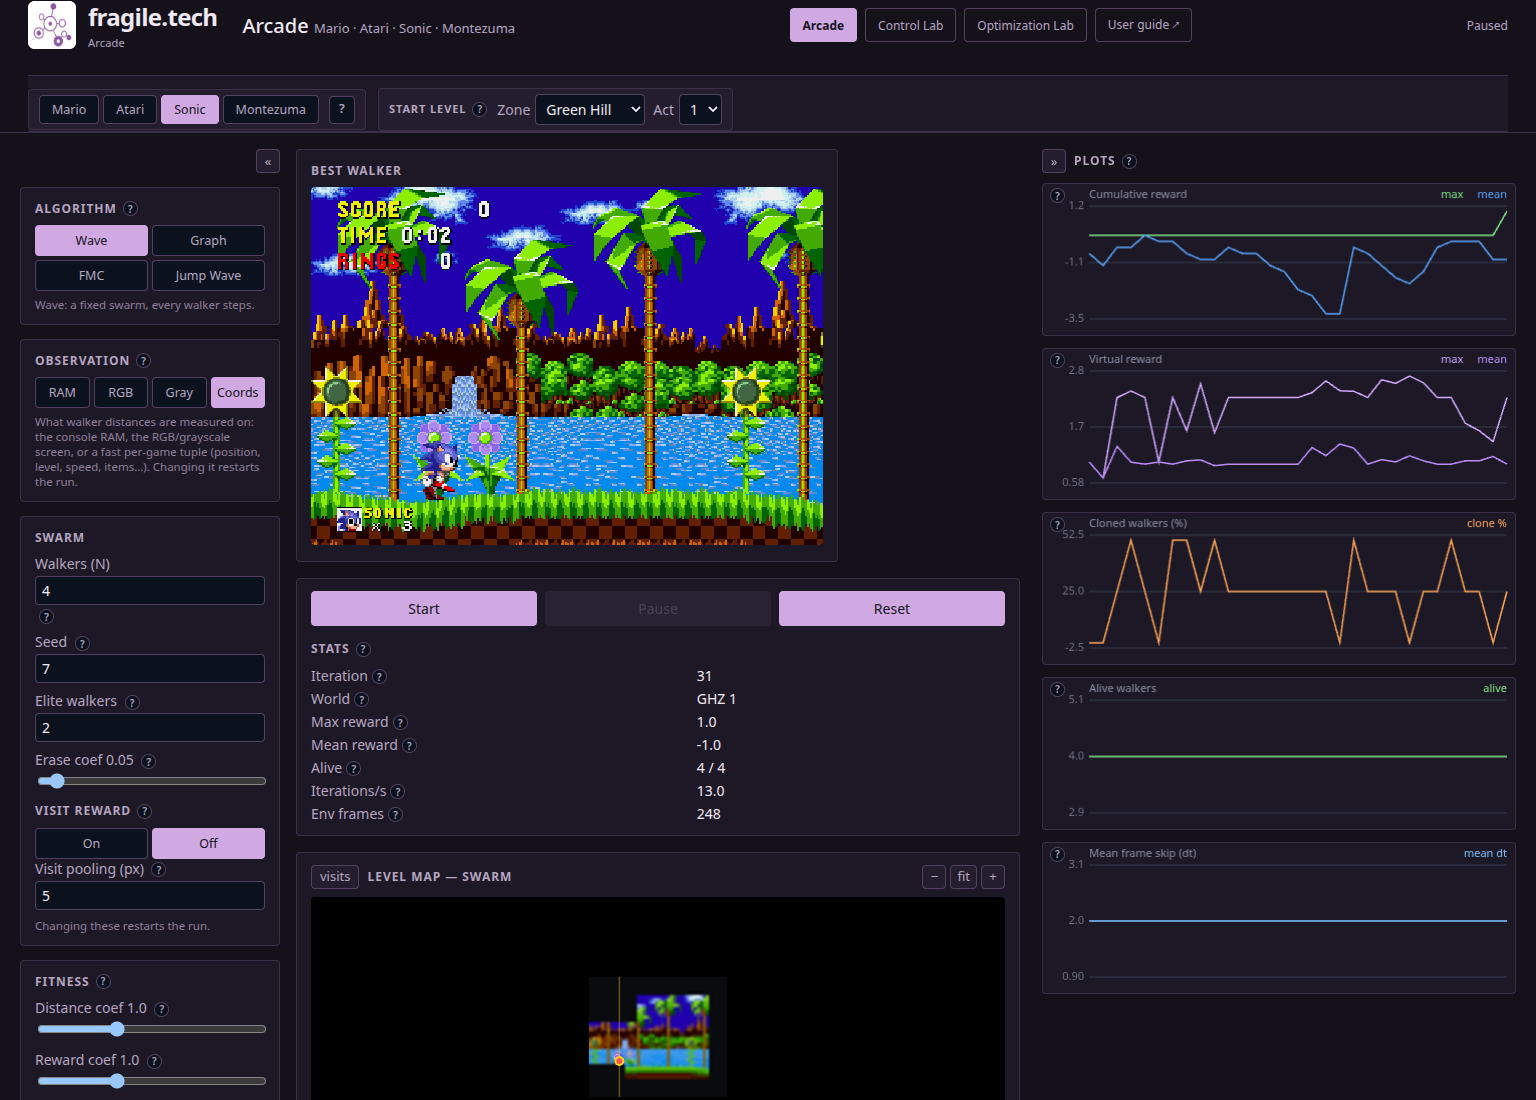
Fig. 37 The fog map records the swarm’s knowledge of the selected Sonic zone and act. Level regions awaiting exploration remain dark until a walker carries its camera there.#
Sonic caveats#
The map and the observation use different coordinates. Coords stores the player’s level position and velocity; the fog map uses the camera position to place screen tiles. A player can be in the same level x-coordinate while the camera is showing a different vertical slice. Use the fog map’s camera placement for screen geometry and the six-element observation for player state.
The exploration bonus belongs to a walker’s lineage. When a walker clones a companion, it inherits that companion’s remembered cells; each cell contributes its novelty bonus once within that lineage, so copying and walking in circles retain the same one-time reward. The memory is cleared when the act changes. This is why the bonus can encourage backtracking while keeping its total finite per lineage and act.
Montezuma / ALE with dedicated logic#
Montezuma is the Atari exception that earns its own button. The emulator is still ALE, but the Lab knows enough of Montezuma’s Revenge’s RAM layout to name the room, project Panama Joe into that room, remember which rooms a lineage has visited, and steer the swarm’s budget away from a known dead end. This is game-specific knowledge layered onto generic Atari.
Selector and initial state#
Choose Montezuma in the console selector. The UI loads the bundled
montezuma_revenge Atari ROM and turns on the dedicated logic automatically.
This mode uses the dedicated ROM and reset state. The generic Atari Game
selector belongs to the other entry point; room identity appears in the readout.
The game begins from its reset state, initially in room 1 of the first temple
level (shown as L1 in the readout).
World/Stage and Zone/Act controls belong to the other modes. The current room, level, inventory, and lives are read from each walker’s emulator state after the step.
Montezuma observations#
Montezuma’s Coords vector has two kinds of position. room, x, and y tell
you the game’s local coordinates. global_x and global_y place that local
position into the temple pyramid, with one room-width of separation between
adjacent room cells. Thus the global coordinates keep a state in room 0 distinct
from a state in room 1 even when their local x values match.
The Atari RAM y-coordinate grows upward, while a screen image grows downward. The UI converts it when it places the walker dot on the room image. Inventory is a bitmask; different bits represent carried objects such as keys, the torch, sword, and hammer.
Coords entry |
Meaning |
|---|---|
|
Position in the 9-by-4 pyramid canvas, in room-image pixels. |
|
Montezuma room number. The initial room is 1. |
|
Local RAM position in the room; RAM |
|
Temple level identifier, stored zero-based and shown as L1, L2, and so on. |
|
Object inventory bitmask. |
|
Remaining lives. |
RAM and generic Coords are different here. RAM remains 128 bytes, while dedicated Coords is the eight-value tuple above. RGB and Gray use ALE’s \(160\times210\) frame; the top 50 rows are the HUD, and the map uses the remaining \(160\times160\) room image.
Montezuma actions, reward, and termination#
Actions come from ALE’s minimal action set for Montezuma, just as they do for a generic Atari game. What changes is what happens after the action. The reward is the ALE score delta plus a one-time new-room bonus, $500 by default, for each room first entered by that walker’s lineage on the current temple level. The start room is marked as already visited at reset, so standing still at the start earns a zero new-room bonus. The visited-room mask resets when the temple level changes.
Now the sharp edge: entering room 8 terminates that walker. Room 8 is treated as a dead-end/death room by the dedicated logic, so entry earns a zero new-room bonus and sends the walker to hard-terminal status. This gives the Lab an explicit terminal state at room 8 while the game supplies its death animation; the swarm should spend its search budget on the rest of the temple and let the Lab’s terminal mark prevent repeated rediscovery of that room.
Other life losses follow ALE’s normal recoverable rule when lives remain. The final life, a real game over, and room 8 are hard terminations. The action hold ends as soon as one of those conditions is reached.
Event or term |
Dedicated Montezuma behavior |
|---|---|
Game score |
ALE score delta multiplied by the Game score weight; default multiplier \(1\). |
New room |
One \(+500\) bonus per newly entered room in the lineage and level; the death animation carries a zero new-room bonus. |
Room 8 |
Hard termination on entry; room bonus is \(0\). |
Life loss |
Walker is done; recoverable when lives remain, with room 8 assigned hard-terminal status. |
Final game over |
Hard termination. |
Reward panel |
Game score and New-room bonus can be tuned live. |
The 24-room pyramid map#
The initial temple level has 24 rooms arranged in a 9-column by 4-row pyramid. The rows contain 3, 5, 7, and 9 rooms, numbered as follows:
Pyramid row |
Rooms, left to right |
|---|---|
Top row |
0, 1, 2 |
Second row |
3, 4, 5, 6, 7 |
Third row |
8, 9, 10, 11, 12, 13, 14 |
Bottom row |
15, 16, 17, 18, 19, 20, 21, 22, 23 |
The UI starts with the pyramid’s room outlines and numbers. When an alive walker stands in a room, its HUD-cropped \(160\times160\) image can be revealed in that cell. Rooms awaiting their first visit remain dark; the dots show where the current swarm is; the gold frame marks the best walker’s room. The image capture keeps stable room frames, filters black or blue transition screens, and preserves a real room during the temporary palette flash shown when an item is collected. This is why a room may be revealed a little after the first transition, while the map is less likely to freeze a misleading frame.
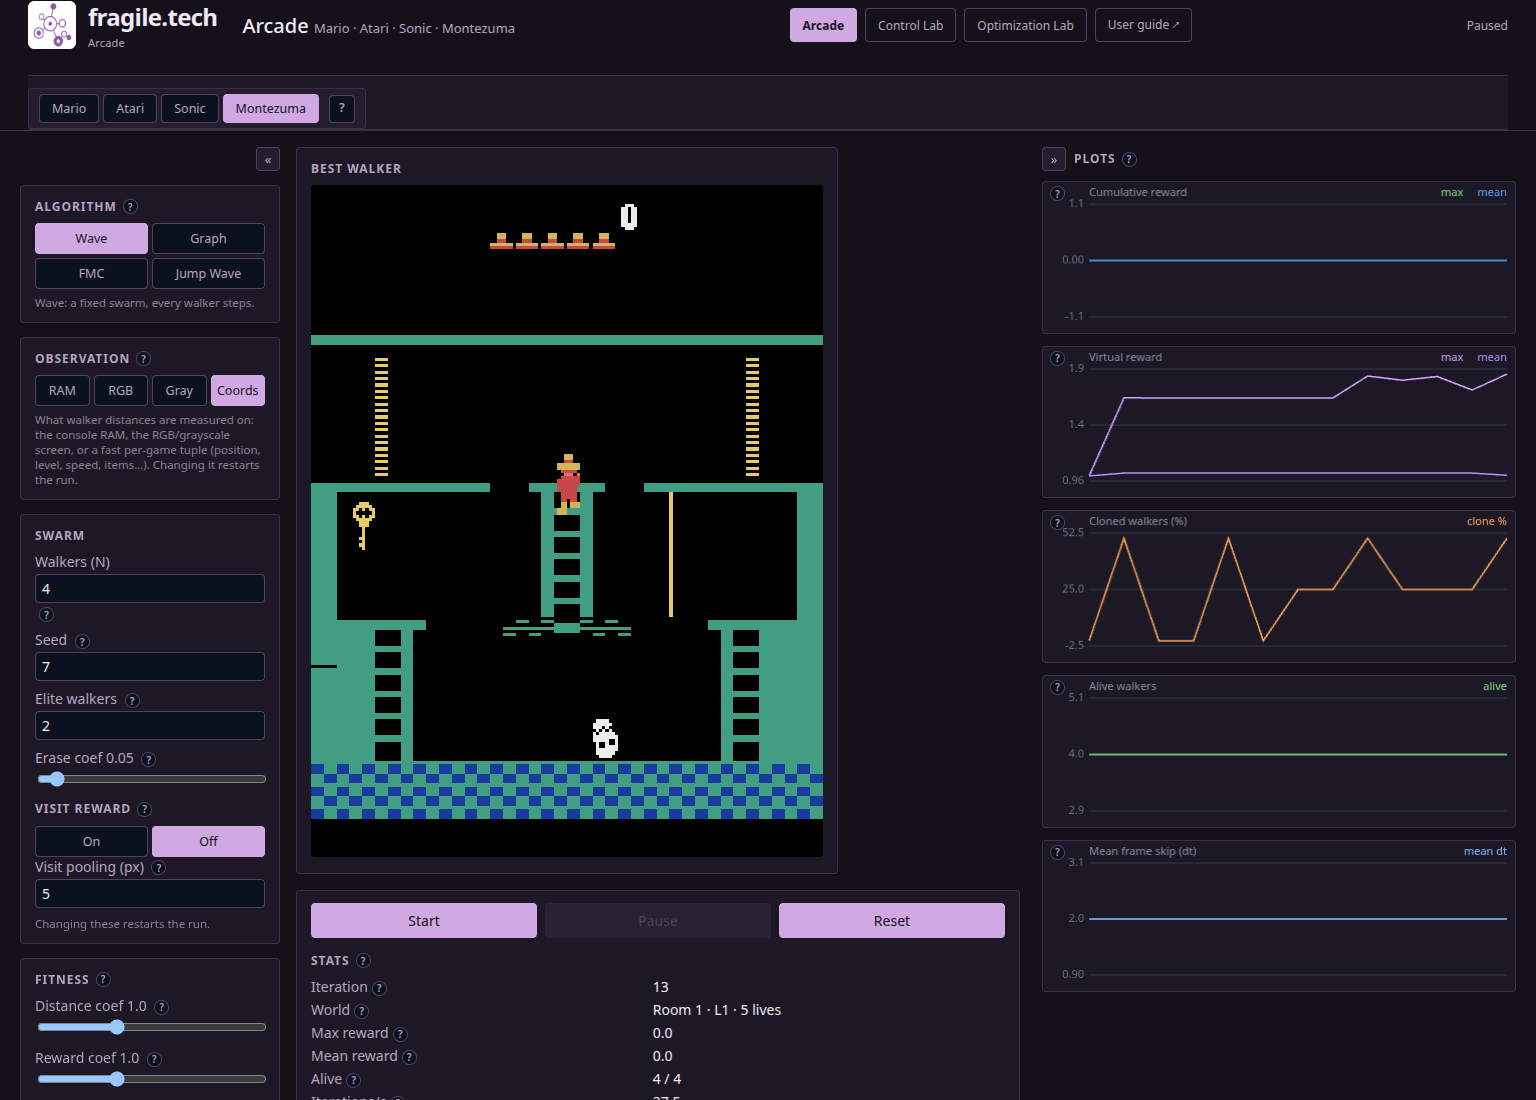
Fig. 38 The dedicated Montezuma map arranges the first temple level’s 24 rooms as a pyramid. Dark numbered cells await revelation by the swarm; room 8 remains visible as a map cell and carries terminal status when entered.#
Montezuma caveats#
Keep three numbers in the readout distinct: the room number identifies a cell of the pyramid, the level identifies which temple level is active, and lives identify the remaining game attempts. The map currently shows one level’s pyramid at a time, so each walker follows its own level context when the map places it in a room cell.
Also keep the two Montezuma entry points separate. Atari → Game → Montezuma’s Revenge is a valid generic ALE experiment, but it deliberately has generic 128-byte RAM semantics and raw score reward. Its generic Atari display supplies the generic view, while the pyramid map belongs to Montezuma. Montezuma is the dedicated experiment: Coords has room geometry, new-room reward is available, the pyramid is built by the swarm, and room 8 is terminal.
Which mode should you use?#
Choose the environment by the question; popularity can be a separate consideration. If you want a known level with an explicit full map and a compact state, start with Mario in Coords mode. If you want to measure a planner against a game’s own score, choose generic Atari and keep its game identity fixed. If momentum and partially revealed long levels are the subject, choose Sonic. If room discovery, inventory, and controlled exploration are the subject, choose the dedicated Montezuma button.
And one final warning about comparisons: a Coords vector is a local language for one environment. Sonic’s scaled velocity and Montezuma’s pyramid-global x are environment-specific quantities, so numerical comparisons with Mario’s raw NES pixels require an explicit common scale. Compare the behavior the representation makes visible, and report the environment, ROM, selectors, observation mode, reward weights, and termination rule alongside any result.