
Getting started with the Arcade Lab#
The Arcade Lab is a crowd of game timelines. Each walker is a complete emulator state carrying the current game state and its timeline. It tries a random sequence of button presses for a little while, earns a game-specific reward, and may be copied by another walker. The swarm reveals the complete story through many alternatives being tried, compared, and copied, so one lucky attempt becomes one part of a larger experiment.
This page gets you from a checkout to a running browser demo, then makes one small Mario run reproducible. For the larger picture—why Wave, Graph, FMC, and Jump Wave show different things—see Arcade Lab.
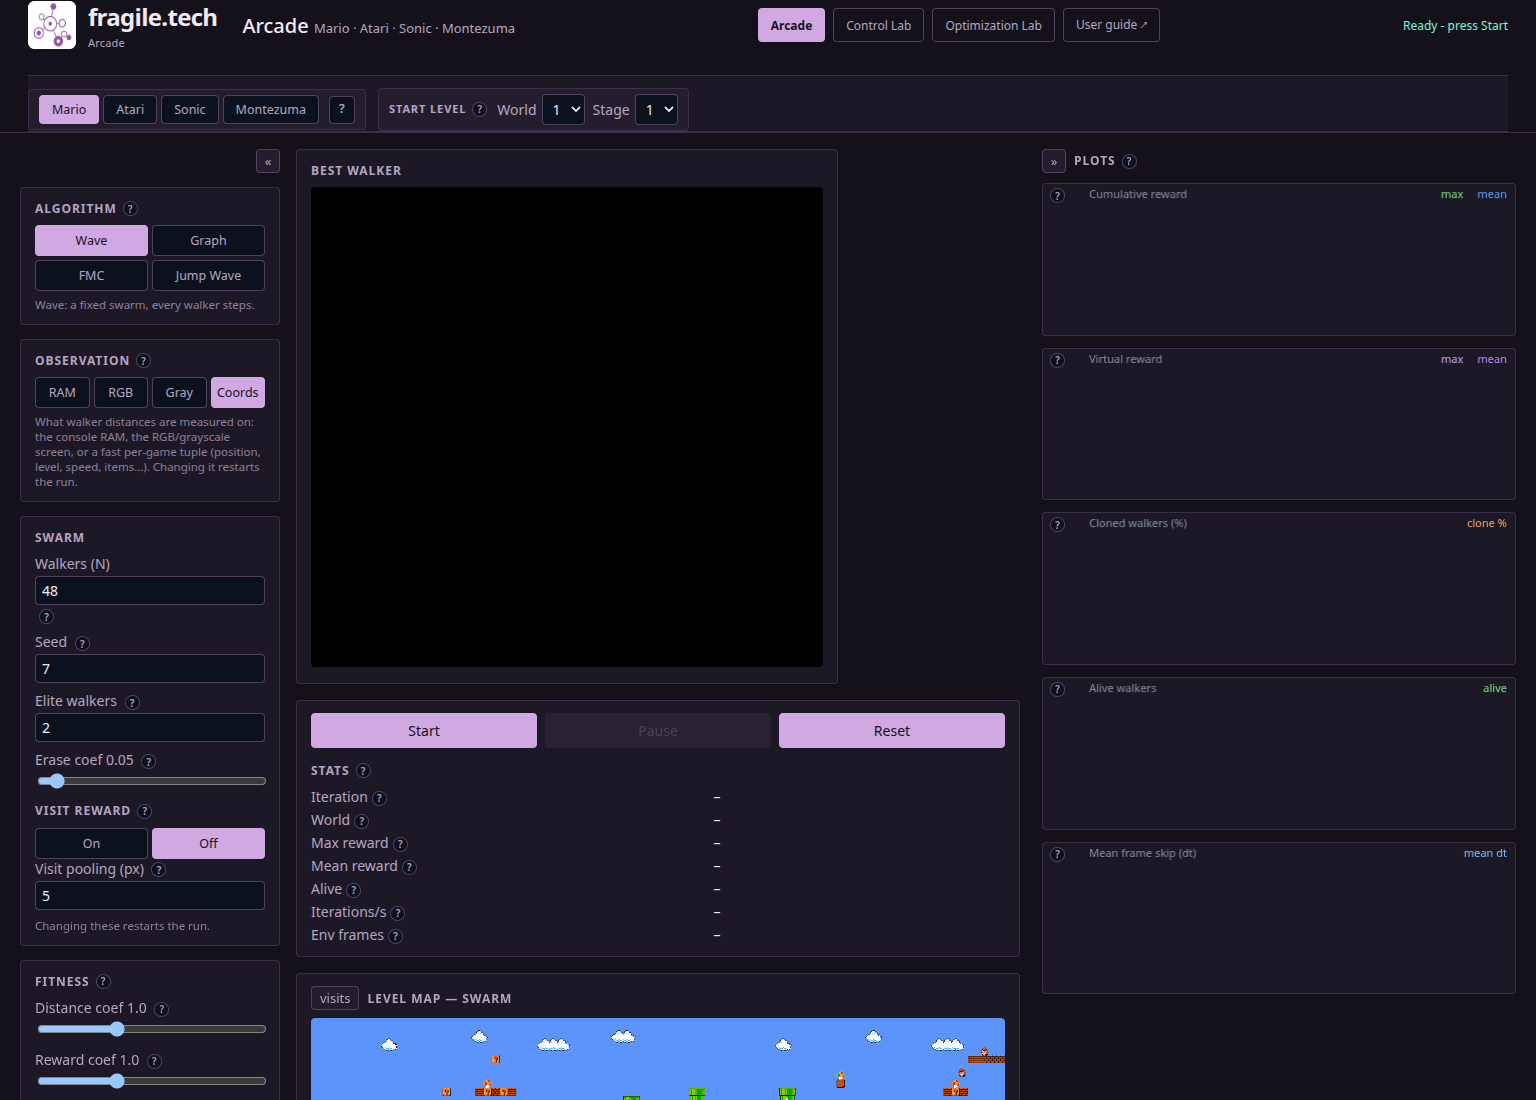
Fig. 34 The Arcade workspace: one leading game view, the controls that define the experiment, the swarm overlaid on a level map, and plots that show how the population is changing.#
Install prerequisites and submodules#
There are two computers involved here. Your machine builds the C++ emulator and
the swarm; the browser later runs those compiled pieces as WebAssembly. For a
complete build you need Git, a C++17 compiler, CMake 3.16 or newer, Python 3,
and an Emscripten SDK. You also need a browser with WebAssembly threads and
SharedArrayBuffer support. Node.js and npm are optional for the browser smoke
test and for creating the encrypted ROM vault.
The first checkout and the first Emscripten build may need internet access. The ROM itself is a separate matter: use a ROM you are permitted to use. Local development can use the plaintext files described below; a deployment can serve the encrypted vault instead.
The Arcade CMake project uses three submodules. nes-py supplies the NES core,
ALE supplies Atari, and stable-retro supplies the Genesis core used by Sonic.
Initialize them from the repository root:
git submodule update --init --recursive
git submodule status -- \
  fractal-gas-web/third_party/nes-py \
  fractal-gas-web/third_party/ale \
  fractal-gas-web/third_party/stable-retro
Warning
The C++ build can appear to be configured correctly while a submodule still
awaits initialization. A healthy submodule supplies headers and source files
under third_party/; check the submodule status whenever those files await
initialization, before debugging CMake.
Build the native and WebAssembly artifacts#
The native and browser builds answer different questions. The native build is a quick way to compile the command-line runner and the dependency-free tests. The WebAssembly build is the one the page loads. You can build only the latter for a browser session, but the native tests are a useful sanity check when changing the C++ core.
Native build#
Run this from the repository root. The commands enter fractal-gas-web, create
a Release build, and compile both fg_tests and fg_cli. The test suite runs
its ordinary tests from the build artifacts alone; the FG_ROM invocation adds
the NES smoke tests using the ROM shipped by the nes-py submodule.
cd fractal-gas-web
cmake -B build -DCMAKE_BUILD_TYPE=Release
cmake --build build -j
./build/fg_tests
FG_ROM=third_party/nes-py/nes_py/tests/games/super-mario-bros-1.nes \
  ./build/fg_tests
./build/fg_cli --rom <smb.nes> --n 64 --iters 200 --seed 7 --cumulative --elite 2
fg_cli is the native experiment runner, while the browser launcher is built
separately below. Give fg_cli a ROM with --rom, and it measures the C++
algorithm in a terminal, independently of a web page. The browser target
writes its runtime modules into fractal-gas-web/web/.
WebAssembly build#
First activate your Emscripten SDK. The embuilder line prepares the Emscripten
zlib port used by the ALE and Genesis portions of the build. Then emcmake
configures the same CMake project for WebAssembly; -pthread is part of the
Arcade target because the browser runs emulator work in parallel workers.
source /path/to/emsdk/emsdk_env.sh
cd fractal-gas-web
embuilder build zlib
emcmake cmake -B build-wasm
cmake --build build-wasm -j
The main build produces web/fractal_gas.js and web/fractal_gas.wasm; the
Genesis path also produces the web/retro_shim.js and web/retro_shim.wasm
worker module. The shell finds emcmake and embuilder once the SDK
environment is active; re-run the source command there to activate it.
Serve the app with cross-origin isolation#
A WebAssembly module works together with the browser’s origin controls. The
browser must be told that the page and its embedded resources belong to a
controlled origin before it will allow the shared memory used by WebAssembly
threads. The repository therefore contains a small server that launches
index.html with those controls in place.
From fractal-gas-web, run serve.py and open the /web/ route:
cd fractal-gas-web
python3 serve.py
# Or choose another port:
python3 serve.py 8091
With the default command, open
http://localhost:8000/web/arcade.html. The server adds
Cross-Origin-Opener-Policy: same-origin and
Cross-Origin-Embedder-Policy: require-corp, and it serves .wasm and module
files with the MIME types the browser expects.
The page checks crossOriginIsolated before it initializes the emulator. When
the status says Not cross-origin isolated, correct the active URL or server:
stop that server, start serve.py, and reload the page. A plain
python3 -m http.server serves files with its standard headers, while this app
gets its required headers from serve.py. The page includes a COI
service-worker fallback for hosting environments that provide these headers
through a service worker; local development should use serve.py directly.
Capture repeatable documentation screenshots#
The documentation capture is a small experiment with a fixed camera: it opens the real browser app, applies its scripted settings, runs a few iterations, and photographs the resulting workspace. From the repository root, run:
ARCADE_DOC_URL=http://127.0.0.1:8091/web/arcade.html ARCADE_SCREENSHOTS=docs/_static/arcade_lab npm --prefix fractal-gas-web run capture:arcade-docs
The command writes the PNGs beside the existing Arcade figures and updates
docs/_static/arcade_lab/capture-manifest.json. The manifest is the lab notebook
for the pictures: it records the capture name and note, viewport, selected game,
algorithm, observation and level, the relevant run parameters, iteration or
played-frame counts, and the final status. This record makes each screenshot
repeatable and evidence-backed.
The capture uses the local plaintext ROM fixtures already described above. It
reuses those existing files and leaves the ROM files unchanged. Before running
it, start the cross-origin-isolated serve.py server on port 8091 and build
the browser artifact so the served WebAssembly and JavaScript files exist.
Load ROMs locally or from the encrypted vault#
The page looks for a ROM in a deliberate order: a plaintext file next to the
page, this browser’s IndexedDB cache, and then the encrypted blob in
web/roms-enc/. A local checkout can read the plaintext file directly, while a
hosted copy can keep plaintext ROMs out of its distribution.
For local development, the browser names are:
Mario:
fractal-gas-web/web/test-rom.nesSonic:
fractal-gas-web/web/sonic.romAtari:
fractal-gas-web/web/roms/atari/<game>.bin
The NES submodule includes a test Mario ROM. If you are using that permitted test asset, copy it to the filename the page requests:
cd fractal-gas-web
cp third_party/nes-py/nes_py/tests/games/super-mario-bros-1.nes web/test-rom.nes
On a deployment, the committed encrypted files under web/roms-enc/ are the
fallback. Enter the password in Unlock ROMs when the page asks. One password
unlocks the vault; the browser decrypts the ROM with Web Crypto and remembers
the successful password and decoded ROM in IndexedDB for later visits. The
decrypted bytes are passed to the local worker that owns the emulator.
If you are preparing that vault from plaintext files, run the repository’s
helper from fractal-gas-web:
FG_ROM_PASSWORD='choose-a-password' node tools/encrypt-rom.mjs --all
Sonic has one extra escape hatch. Select Sonic, then choose a file in
Sonic ROM (.md) after the local and encrypted sources have been checked and
the browser still needs a usable ROM. The input accepts .md, .bin, .gen,
and .smd; the file is read in the browser and stored in that browser for
future visits. The Arcade UI keeps the file in the browser. After the ROM is
ready, choose Sonic’s Zone and Act. Changing either start-level
selector initializes a new run.
Make a reproducible first Mario run#
We want the first experiment to be small enough to understand and specific enough to repeat. The important phrase is same ROM, same settings, same seed. The seed fixes the random choices made by the swarm; your processor may run at a different wall-clock speed from somebody else’s machine. The UI starts with Mario, Wave, Coords, World 1, Stage 1, and seed 7. Set the values explicitly so the experiment is written down and easy to recall.
Open
/web/and wait for the status to say Ready - press Start. When the page shows Unlock ROMs, enter the vault password. Placeweb/test-rom.neswhenever the Mario ROM needs a local file.Select Mario, Wave, and Coords. Set World to
1and Stage to1.In Swarm, set Walkers (N) to
48, Seed to7, and Elite walkers to2. In Kinetics, set dt min to6and dt max to30. Leave Distance coef and Reward coef at1.0.In the Mario Coords controls, set Visit reward to Off, Visit pooling (px) to
5, Erase coef to0.05, and Visit coef to1.0. Wave starts with this setting Off; naming it here matters because the visit term changes the selection signal while the game remains the same.Press Start. Wave advances every walker, updates the screen of the leading walker, draws the swarm on Level map — swarm, and fills the cumulative-reward, virtual-reward, clone, alive, and frame-skip plots.
Let a few iterations accumulate, then press Pause. Record the seed and settings with any observation you want to keep. The
Env framesstatistic reports the number of frames actually emulated; average frame skip provides a separate estimate.Press Reset, then Start again. Reset returns to the initial Mario state with the same active settings and seed, clears the readouts, plots, and map overlay, and leaves the run paused until you press Start.
Expect the walkers to explore multiple directions. This behavior shows the map working as intended: the swarm is exploring alternatives, and dead walkers are replaced by cloning on a later iteration. Read Cumulative reward as game progress and Virtual reward as the signal used to decide which timelines get copied; they answer different questions.
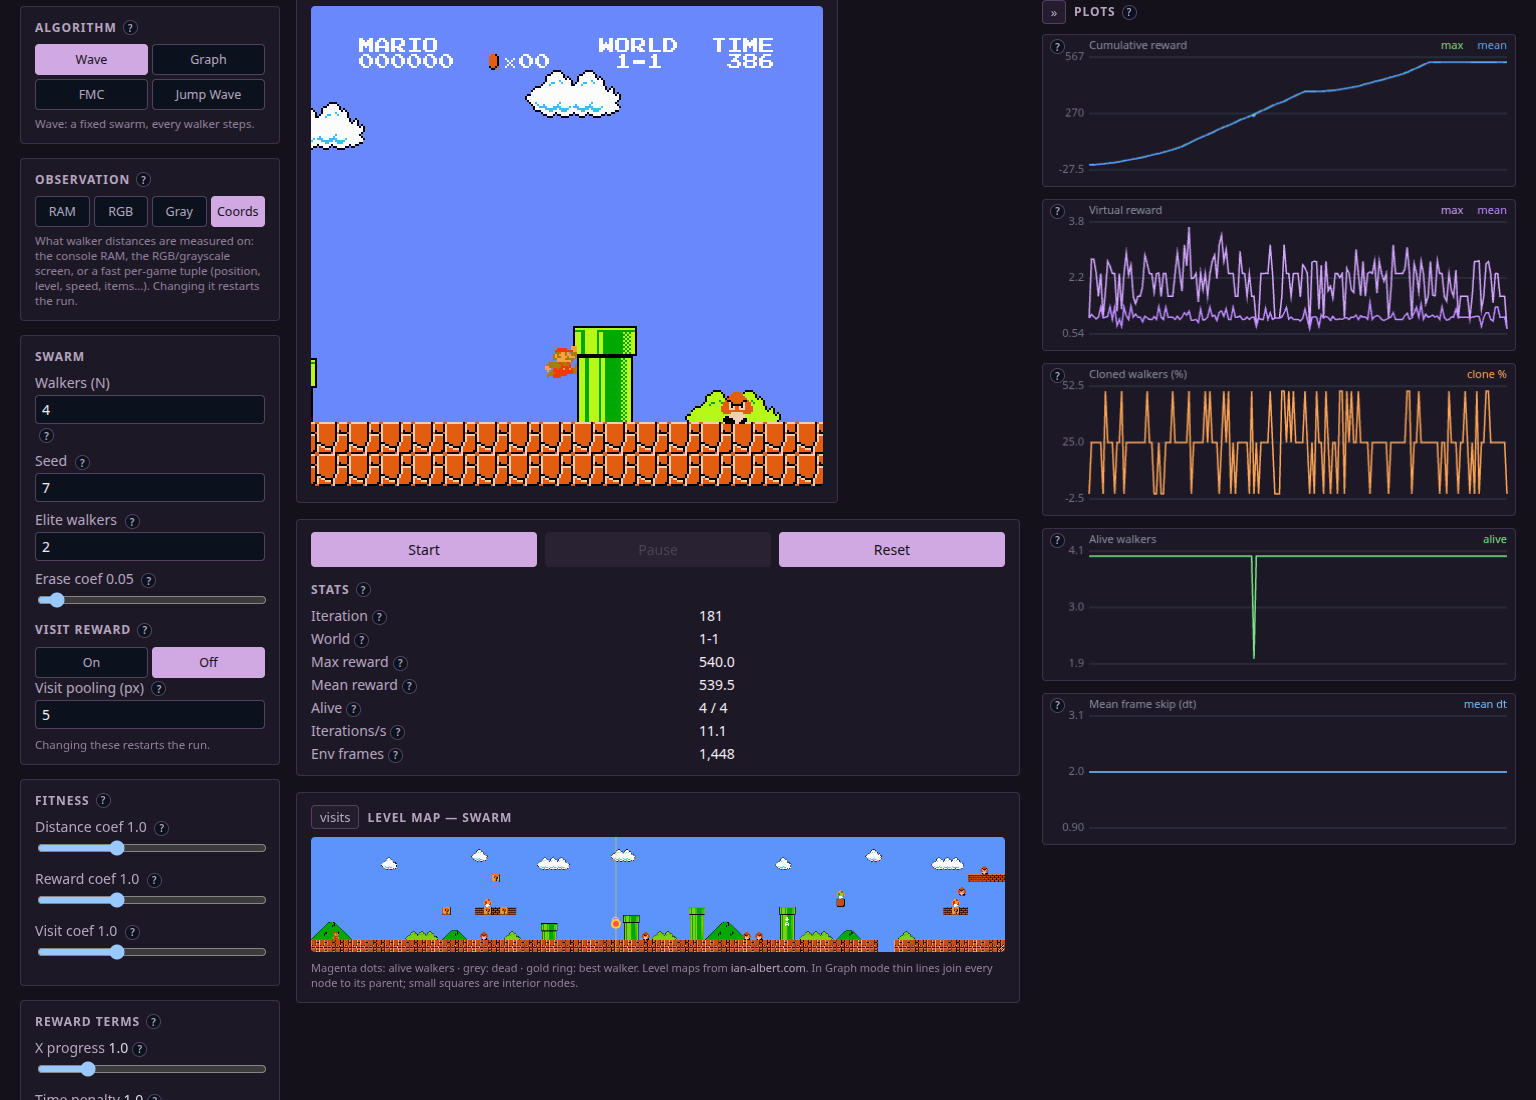
Fig. 35 The Mario map shows the whole selected level with the current swarm overlaid. Alive walkers are magenta, dead walkers are gray, and the gold ring marks the best walker. It depicts many emulator states across the population and captures the evolving search, while a single playthrough represents a separate trajectory.#
Use Start, Pause, and Reset#
The three buttons control the run state; the selected settings define the experiment.
Start begins the worker loop, or resumes it after a pause. Pause stops new iterations while preserving the current swarm; for FMC and Jump Wave, it also preserves the current search or committed trajectory. Reset stops the loop and calls the emulator’s reset operation, then clears the browser’s run readouts, plots, map state, and displayed frame. It keeps the selected console, level, algorithm, and settings, so it is the button to use after an all-walkers-dead stop or a completed game.
Wave and Graph show the leading search walker. FMC and Jump Wave show the one game whose actions have been committed, while their plots still describe the planning population. That is why the screen title changes from Best walker to Played game when you select a planner.
Know which settings restart and which are live#
Here is the distinction that saves the most confusion. A restart-required setting changes the shape or identity of the state being copied: changing the number of walkers, for example, requires the UI to construct a new population. The UI reinitializes the run when such a control changes.
The live controls modify the next planning steps and preserve the past. In particular, a reward-term change applies to reward earned from then onward; reward already banked by a walker keeps its earlier weighting.
Restart required |
Live while the run exists |
|---|---|
Console and game: Mario, Atari game, Sonic, or Montezuma |
Distance coef and Reward coef |
Start level: Mario World/Stage or Sonic Zone/Act |
Visit coef, Visit reward, Visit pooling, and Erase coef when those controls are visible |
Algorithm: Wave, Graph, FMC, or Jump Wave |
dt min and dt max |
Observation: RAM, RGB, Gray, or Coords |
Elite walkers for Wave, FMC, and Jump Wave |
Walkers (N), or Graph’s Max walkers |
Planner horizon; Jump Wave’s Stop at first bifurcation and Maximum search horizon |
Seed |
Mario, Sonic, and Montezuma reward-term sliders |
For FMC and Jump Wave, changing a live planner or fitness setting clears any pending plan and searches again from the currently committed game. The current game state remains in place. For Wave and Graph, the existing swarm continues and uses the new live values on subsequent iterations.
The Graph has a special vocabulary: the Swarm number is shown as Leaves (start = min leaves), and Max walkers is its node cap. Graph also turns visit counting on by default in Coords mode for games with maps; Wave begins with visit counting set to Off by default. These changes affect behavior, so switching algorithms restarts the run and resets the interpretation of the population.