Asteroid harvesting: hook, tow, and deliver#
Your rocket has a simple job: bring loose ore into the delivery base. The difficulty is that steering the rocket does not directly steer its hook or cargo. The hook is a separate physical body even when empty. Its tether transmits force back to the rocket, the rock keeps its momentum, and gravity bends their trajectories. Learn to recognize an approach, an attachment, and a delivery as three different stages. Then the planner’s decisions become much easier to interpret.
The shipped rocket scene now starts in side-on flight with gravity pointing downward. That changes how the motion looks and how you must read the trajectories, but it does not change the lesson: acquire the cargo, tow it, and bring its center into the base.
Start the application using Getting started with the control laboratory. This tutorial uses the stock Asteroid harvesting environment. Find the other tasks in Task tutorials, the complete controls in Controls, planners, and diagnostics, and scene customization in Scenes, agents, and the editor.
Read the arena before moving#
Choose Asteroid harvesting from Environment, wait for the backend to become ready, and press ↺ (Reset). This removes any movement from the initial page load. The shipped scene presents the flight side-on, with downward gravity; use Side / overhead to snap between those preset angles. Scroll to zoom, right-drag to rotate and tilt the camera, and middle-drag or Alt-drag to pan. Follow agent keeps your chosen angle as the rocket moves. Whole arena and Reset view restore the scene’s initial angle, arena center, and default zoom. These camera operations preserve physics.
The scene occupies a 64-by-44 world-coordinate rectangle, but its irregular outer
boundary encloses a smaller playable region. The rocket starts at [16, 16].
The nearest rock starts at [19, 19], and the base is centered at [12, 11].
Its outer boundary has radius 3; the inner delivery boundary has radius 1.5
with the stock Keep delivered rocks setting enabled. These coordinates are useful when inspecting entities in the editor;
they are world units, not screen pixels. Screen directions change with the camera.
There are five cargo rocks, initially at [19, 19], [45, 31], [47, 12],
[16, 31], and [41, 9]. At the default asteroid weight of 1×, their masses
are 0.03, 0.05, 0.02, 0.02, and 0.04 respectively, compared with the rocket’s
mass of 1 and the hook’s mass of 0.25. These baseline rock masses are 100
times lighter than the earlier preset; the slider still starts at 1×.
The stock load supports towing in flight with a single rocket. With the largest rock attached, the combined mass is 1.30: downward gravity of 9.81 gives a weight of 12.753, below the rocket’s maximum thrust of 16, leaving about 20% of maximum thrust available beyond static weight support. That comparison assumes upward thrust and accounts for the uniform downward field. Turning, cable swings, drag, and the gravity well still affect the trajectory; lift capacity does not guarantee a delivery.
The central polygon is a hole in the arena, not a shortcut. The gravity well at [46, 22] attracts bodies; it has strength 28
and softening 3. Softening moderates the field near its center, but does not remove
its pull.
Enable Collision geometry to see the physical boundaries. All shipped presets
start with wall death disabled and a wall collision penalty of 100. To make wall
contact terminal, enable Setup > World physics > Die on wall collision
(physics.lethal_walls) and choose Apply and restart. Contact by any controlled
vehicle with an outer wall or hole boundary then ends the whole world, with the
wall penalty still charged on that frame. Passive cargo and hooks trigger neither
wall penalties nor wall death. Older imported scenes that explicitly set
physics.lethal_walls to true retain that behavior. Body collisions are not
configured as lethal in this scene, but bumping a rock can still spoil an approach
or throw the tow toward a wall.
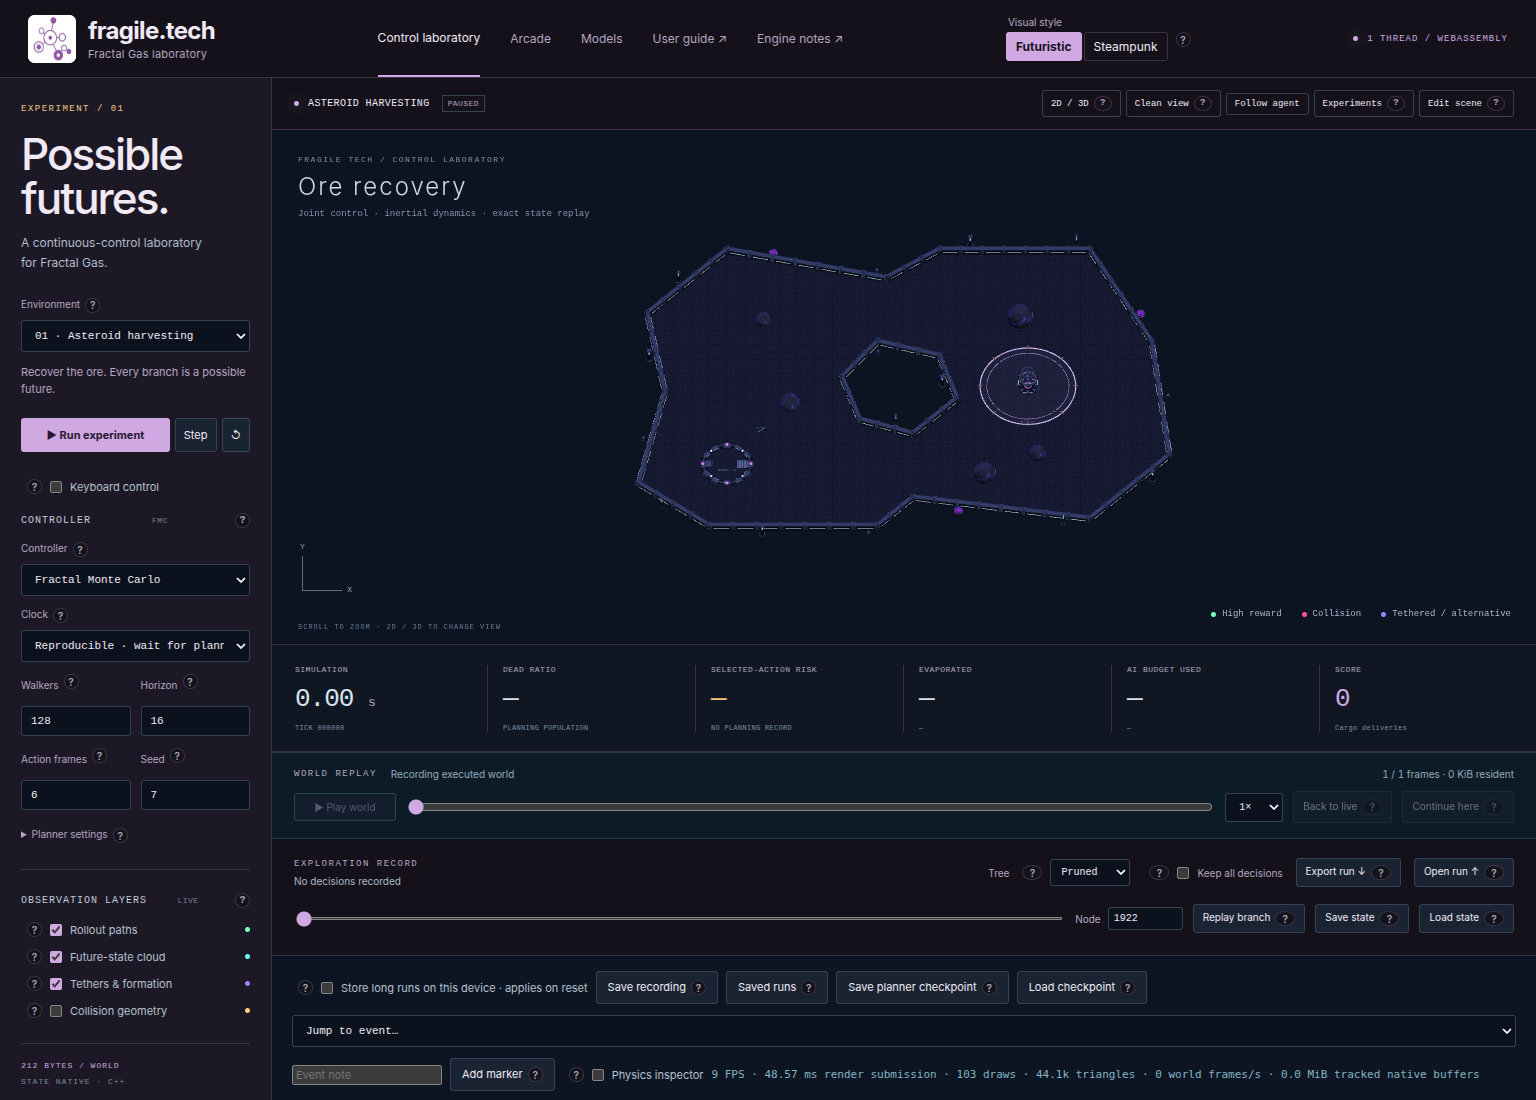
Fig. 5 The reset arena in the side-on view. Locate the base and nearby cargo before turning on continuous control; this image shows the starting layout, not a delivery.#
Make a reproducible first run#
Use a modest, explicit planning configuration so you can repeat the sequence and inspect each decision. This is an operating baseline, not a claim that the solver will always deliver cargo with these settings.
Select Fractal Monte Carlo in Controller. Set Clock to Reproducible · wait for planning.
Set Walkers to 128, Horizon to 16, Action frames to 6, and Seed to 7. Under Planner settings, set Worker threads to 1. This deliberately changes the UI default of 4 to a portable serial baseline. In the visible Reward terms panel, leave Diversity coefficient and Reward coefficient at 1. Leave Action noise at 0.2, Elites at 0, and Perturb inherited actions checked.
Select Pruned under Tree and press ↺ after setting the fields. Many settings changes rebuild the world and clear its recording, so finish setup before starting a run you intend to save. Hook mass can also change live without resetting the run.
Leave Rollout paths, Future-state cloud, and Tethers & formation enabled. Press Step once. The planner computes a decision and commits up to six physics frames. At the preset’s
1/60second timestep, an ordinary nonterminal step advances 0.1 simulated seconds.Switch to the overhead view. Identify the solid rocket’s new pose separately from the paths and cloud. Those overlays show candidate futures; a path passing through the base does not establish that the actual cargo reached it.
Press Step several more times, inspecting the gap to the nearest cargo. Once you recognize what changes after a decision, press Run experiment. Use Pause experiment to inspect an approach, attachment, or apparent stall.
Watch the hook acquire a rock, then watch for an increase in the delivery counter. The hook and its rocket cable are visible even before a catch. If wall death is enabled and the episode ends at a wall, inspect the last frames before reset. A failed run still provides the information needed to diagnose the maneuver.
Walkers counts candidate worlds, each containing the rocket, its hook, and all five rocks. It does not add 128 rockets to the arena. The nominal 16-action lookahead spans 1.6 simulated seconds at six frames per action; it is not a promised arrival time.
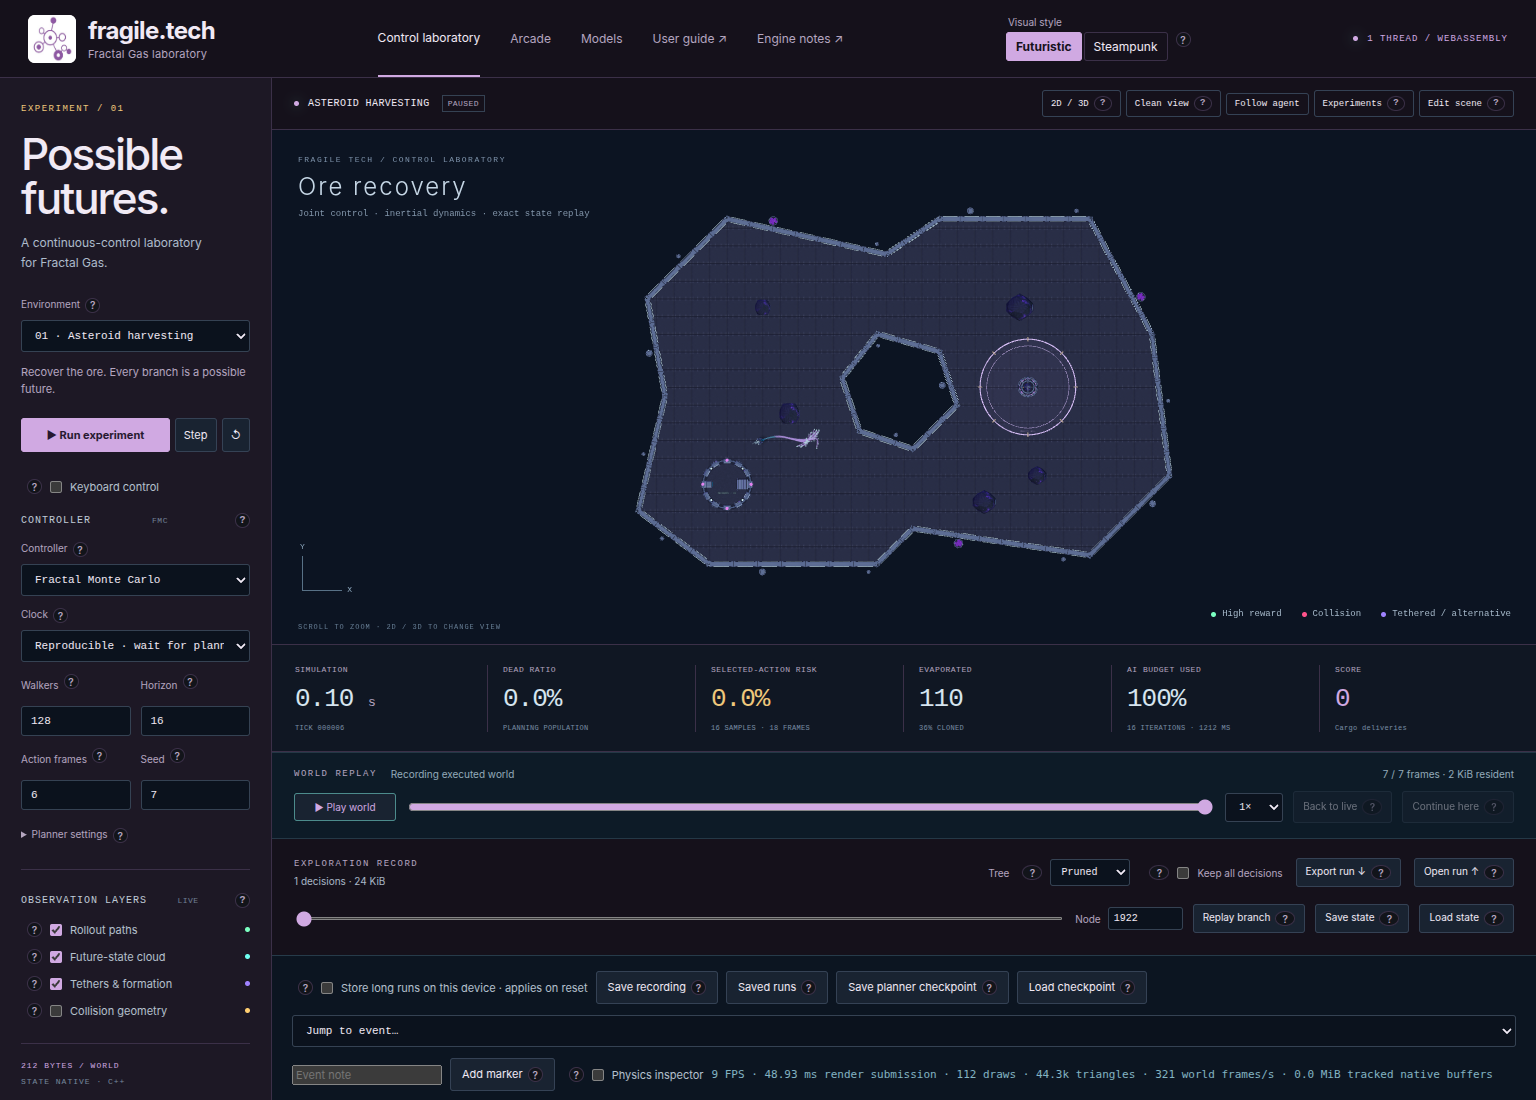
Fig. 6 One decision viewed overhead. Compare the executed rocket with the planning overlays. This early inspection frame does not show a completed cargo delivery.#
Recognize attachment and delivery#
There is no hook key. Each rocket carries a permanent physical hook on a damped cable with a default length of 2.5 world units. The hook has its own position, velocity, collision shape, mass, and inertia. Gravity pulls on it, and cable forces act on both hook and rocket. Because the cable attaches away from the rocket’s center, its pull can also turn the rocket. An empty hook therefore changes flight: watch it swing after a thrust pulse.
The hook and its cable remain visible with Tethers & formation disabled. That control selects diagnostic overlays; it is not needed to see the equipment. The rocket-to-hook connection stays intact through catches, breaks, and deliveries. An empty hook automatically acquires the nearest eligible active cargo whose center lies strictly within 2.8 world units of the hook’s center after a physics step. Measure from the hook, not the rocket; touching model edges is not the test. The hook-to-rock connection can break under a sufficiently large load and can catch again when cargo comes within range.
The stock scene enables Keep delivered rocks. Delivery occurs when an eligible cargo’s center enters the inner disk, whose radius is 1.5, half the base’s outer radius of 3. The two boundaries are drawn separately. Bringing the rocket into either disk does not count: watch the rock’s center cross the inner boundary.
A delivery increments the counter once and detaches every hook from that rock. The rock stays in the world with its motion and collisions intact, while each physical hook remains on its rocket. A retained delivered rock cannot be caught or selected as an approach target until its center is strictly outside every outer drop-zone boundary. Crossing the inner boundary again while still inside the outer zone does not add deliveries. Once the rock leaves all outer zones, it becomes eligible again and can be caught and delivered again.
Change Keep delivered rocks, then choose Apply and restart to start a run with the new setting. With it disabled, delivery uses the full radius-3 disk and the existing respawn behavior: the five preset rocks respawn after delivery. Older scene definitions that omit this setting also use the disabled behavior. There is no special automatic victory termination after the first delivery; the experiment runner’s chosen success criterion is a separate stopping rule.
Harvesting allows four reward terms: progress, distance_squared, catch, and
wall_collision, evaluated once per physics frame:
With an empty hook, progress is the reduction in distance from that hook to the nearest eligible active asteroid.
With a hooked asteroid, progress is the reduction in distance from the asteroid to the nearest discharge-zone center. Moving away gives negative progress.
Each catch adds 10, including a catch after a break. The baseline adds the mean squared displacement of the controlled rockets during that frame.
Each controlled vehicle touching an outer wall or hole boundary costs 100 by default. The penalty is charged once per vehicle per physics frame: sustained contact costs again every frame, while corners and repeated physics substeps add no extra charge within that frame.
Progress and the squared movement baseline both have default weight 1. Progress
is averaged over controlled vehicles, while catch bonuses are summed. Progress
compares the same attachment phase before and after physics; catches, deliveries,
and respawns are handled afterward, so switching targets or respawning cargo does
not create a distance-reduction bonus. The catch bonus is editable in the reward
controls. The separate rewards.collision term covers vehicle/body contacts only
and remains disabled for harvesting. No delivery bonus, unrestricted hooked-rock
travel, or other reward term contributes to harvesting.
Set Rewards > Wall collision penalty (rewards.wall_collision) anywhere from
0 to 10000, then choose Apply to current run to change it live while
preserving the run state. This term applies to every Control Lab task, including
harvesting, mining, and older imported scenes. When an older scene omits the term,
the new default of 100 affects future or resimulated rewards; historical stored
records are not rewritten, and the snapshot layout is unchanged.
A positive reward total does not prove a delivery: approach, catches, and rocket movement can all add reward earlier. Use the delivery counter to answer “did ore arrive?” and reward to study what the controller was optimizing. A displayed task score, reward total, and experiment success flag need not report the same quantity.
Try the maneuver with your own controls#
Export any run you want to preserve before resetting. For a manual practice run, press ↺, enable Keyboard control, and click the world so a text or numeric field no longer has focus. With this single controlled rocket, input targets it automatically unless you have selected another body in the editor.
Tap A or D to apply positive or negative turning torque. Turning changes the direction of future thrust; it does not instantly rotate the velocity.
Use short W presses to thrust toward the nearby rock. Approach gradually, and watch the physical hook for attachment.
After attachment, orient toward the base and apply short thrust pulses. Keep watching the rock: towing past the base with the rocket while the cargo swings outside the inner delivery disk is not a delivery.
To slow the rocket, turn against its motion and thrust. S cannot produce reverse thrust on this forward-only actuator. Q/E and Space have no strafe or brake channel to operate on this rocket.
For finer inspection, open Edit scene, expand Actuator channels, set the named thrust and torque sliders, and press Apply action · 1 frame. Moving a slider alone does not advance physics. A zero-input frame still allows momentum, gravity, and drag to act.
Manual input pauses autonomous execution. While keys are held, the keyboard adapter requests two physics frames roughly 30 times per wall-clock second. Releasing all keys stops these manual steps; it does not leave the simulation coasting on a separate clock. Uncheck Keyboard control before returning to Step or Run experiment. See Scenes, agents, and the editor for the full editor workflow.
Change one variable and record the outcome#
First compare two nearby planning budgets. Export the baseline run, change Horizon from 16 to 32, reset, and repeat with seed 7 and the other fields fixed. The nominal planning reach doubles; computation also grows, and successful delivery is still something to measure. A second useful comparison changes Action frames from 6 to 3: each executed action becomes finer, but the same 16-action horizon now looks only 0.8 seconds ahead. Do not describe that as a pure improvement in control precision without acknowledging the shorter prediction interval.
You can also change Hook mass during a run with its numeric field or slider. The default is 0.25, and accepted values run from 0.01 to 100. A mass change preserves body positions, velocities, attachments, counters, and simulation time; it updates the hook’s inertia and the planner’s future predictions. Compare small changes first: a heavier empty hook already loads the rocket before any rock is caught. Scene exports retain the mass setting, and recordings retain live mass changes for replay.
For a delivery benchmark, open Experiments, leave All preset scenes unchecked,
and explicitly choose Cargo deliveries in Success metric and 1 in
Success target. Set Population to 128, Lookahead · actions to 16,
Action duration · frames to 6, Seeds to 7,11,19, and choose an explicit
Episode limit · frames, such as 1200. Select the two controller variants and
press Run benchmark. A 1200-frame limit gives each trial up to 20 simulated
seconds; it does not guarantee that either variant can complete a delivery.
The benchmark UI always sends its selected goal and may retain a prior task’s
selection. The stock harvest JSON has no evaluation declaration: an API or CLI
benchmark that omits its goal falls back to survival through its frame limit.
Therefore set {"metric":"deliveries","target":1} explicitly in a programmatic
goal too. Surviving and delivering are different experiments. A terminal frame
cannot count as a successful delivery trial. See Experiments, comparisons, and performance
for parameter overrides, timing, and report interpretation.
To keep an illustrative live run, press Pause experiment, then Export run. Use WORLD REPLAY to seek back through actual motion and Play world to watch it. Back to live restores the paused authoritative view. An in-memory export contains the scene, settings, recorded motion, and retained exploration entries; Save state alone is only a world snapshot. Follow Record, replay, and continue experiments for device-backed recording and planner checkpoints.
Diagnose what prevented delivery#
Observation |
What to check and try |
|---|---|
The visible hook does not catch a rock |
Check hook-to-rock center distance. Acquisition requires eligible active cargo strictly within 2.8 world units and a physics step; diagnostic overlays do not affect catching. |
An empty hook changes rocket motion |
This is expected: the hook has mass and transmits loads through its cable. Check Hook mass and watch its swing before increasing thrust. |
The rocket reaches the base but deliveries stay at zero |
Follow the attached rock. With Keep delivered rocks enabled, its center must enter the inner radius-1.5 disk; the rocket’s position is insufficient. |
The rocket keeps moving after zero thrust |
Momentum and gravity remain. In manual mode, advance zero-input frames to observe coasting, or turn and thrust against motion. |
Motion stops and Run does not continue |
Inspect terminal status. If Die on wall collision is enabled, check the last controlled-vehicle wall contact. Reset starts another episode; camera changes cannot revive a terminal world. |
The cloud reaches the base but actual motion does not |
The cloud contains predictions. Inspect the solid bodies and WORLD REPLAY for executed motion. |
Delivered cargo remains near the base but cannot be hooked |
With Keep delivered rocks enabled, this is expected. Its center must leave every outer radius-3 zone before it becomes eligible again. |
Cargo vanishes near the base |
Check Keep delivered rocks and the delivery counter. With retention disabled, stock cargo respawns after delivery; its relocation does not earn progress reward. |
Keyboard input seems ineffective |
Enable Keyboard control, click outside form fields, and check that the selected body is the controlled rocket. |
A settings adjustment lost the trajectory |
Die on wall collision requires Apply and restart. Wall collision penalty uses Apply to current run and preserves state, as do live Hook mass changes. Export the run before changing settings that restart it; use a reopened recording to revisit an earlier trial. |
Reward rises without experiment success |
Check the selected metric. Progress reward can increase without a cargo delivery; success also requires a nonterminal world. |