
Ants & drops: collect and deliver resources with a fleet#
In Ants & drops, you control a fleet in a bounded arena. A vehicle collects a drop by touching it, filling its onboard deposit one unit at a time. Both harvesters and drones start empty and hold 5 drops by default. The same cargo settings apply when you choose rockets or karts. A full vehicle must return to the shared refinery and discharge its cargo before collecting again. Collection and unloading are automatic; neither needs a button.
Each collected drop disappears, then returns at a seeded random position after three simulation seconds. Food collected counts pickups. The fleet readout also shows X units delivered · Y loads. Watch these delivery counters as well: a pickup count alone does not tell you how much material the fleet has brought home.
Start here to learn how physical vehicle count differs from planner population, how harvesters and drones move, and how to measure a foraging trial. Harvesters remain planar kart vehicles. Vehicle type offers Rockets, Drones, Karts, and Harvesters in every environment. Unless you have explicitly set Flight mode, choosing drones or rockets automatically enables side-on flight and downward gravity, so a drone must use thrust to stay aloft. An explicit flight setting is preserved when changing type. Launch the application using Getting started with the control laboratory; return to Task tutorials for the other tasks. Keep Controls, planners, and diagnostics nearby for the complete operating reference.
Read the arena before running#
The preset starts with five harvesters and 24 pickup slots. The rectangular arena has
an internal rectangular hole: vehicles must travel around it. In the default
physics, wall and body contacts are nonlethal. A low death statistic therefore
does not show that the fleet is collecting efficiently; watch its food counter
and actual movement. Locate the refinery’s unloading apron before starting;
full vehicles need a route back to this shared destination. Its circular zone is
centered at [12, 36] with radius 6. The apron is inside the arena; the processing
building sits just beyond the northern boundary. Drive onto the apron to unload.
Imagine each pickup slot carrying a little countdown clock. Touching an available drop starts its clock. When the countdown expires, that same slot becomes available at another position. Thus 24 slots does not limit the lifetime score to 24, and collecting every currently visible drop does not complete a finite level. The native placement procedure samples arena-interior candidates using the world’s random state; do not expect the same new location after changing the trajectory or collection order.
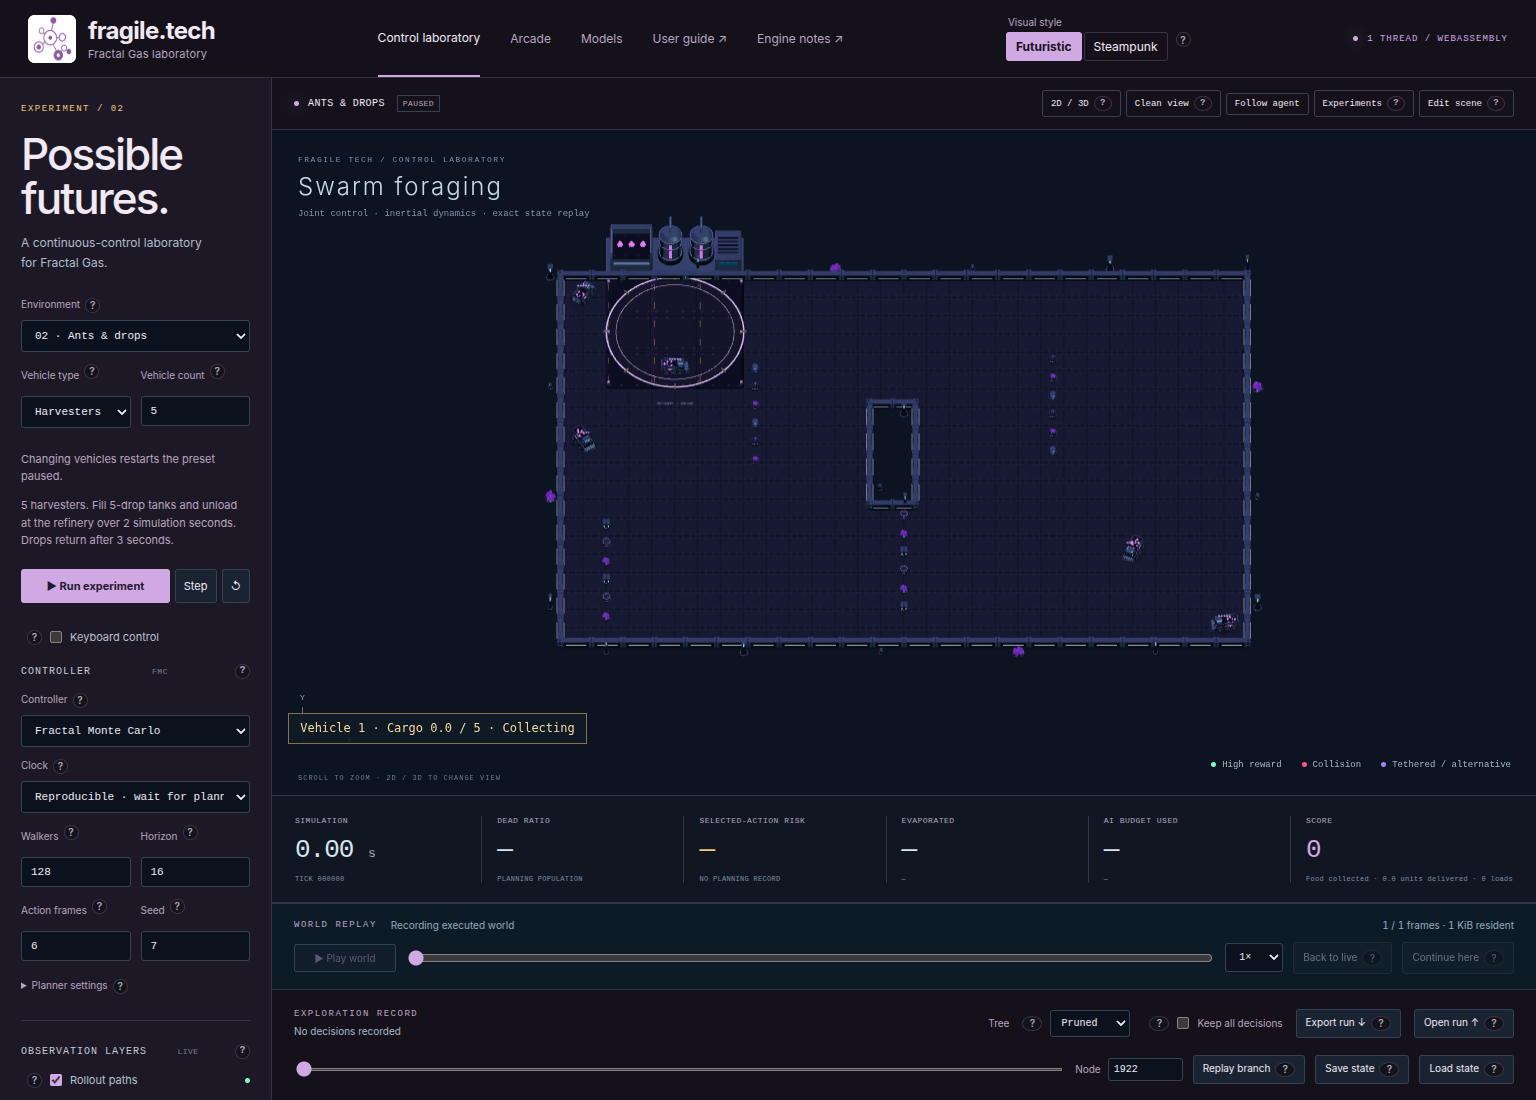
Fig. 7 The current five-harvester starting scene. Find the central obstacle, separate food markers, and refinery apron before running. A full tank must return to the apron to unload.#
Run a repeatable first decision#
Use this small, explicit planning configuration as a baseline. It makes the procedure repeatable with the same compatible engine and settings; it is not a promise that the first decision will collect food.
Wait for WEBASSEMBLY, then choose Ants & drops under Environment. A fresh page can have already executed an initial decision. Selecting the preset and resetting below gives this exercise a known starting point.
Set Vehicle count to 5 and Vehicle type to Harvesters. These controls sit beneath the environment selector. Each change restarts the scene paused, preserving world edits and settings. Type changes also preserve vehicle count and starting positions; count changes preserve existing starts.
Choose Fractal Monte Carlo under Controller. Set Walkers to 128, Horizon to 16, Action frames to 6, and Seed to 7. Leave the other FMC fields at their defaults documented in the controls reference.
Choose Reproducible · wait for planning under Clock and set Worker threads to 1. This explicitly replaces the usual four-thread request with a portable serial baseline. Set both fields again when reproducing from portable planner settings: clock and thread count are session controls.
Disable Keyboard control if enabled, then press ↺ (Reset). Confirm that the world is paused, the food counter has returned to its starting value, and vehicle deposits are empty. Planner-setting changes reset the run, so finish configuration first.
Press Step once and wait for it to finish. The controller searches, chooses a joint action for the fleet, and executes six physics frames. At the preset’s
dt = 1/60second, this advances simulation time by 0.1 seconds.Inspect the solid vehicles, Food collected, and the selected vehicle’s cargo status: Vehicle N · Cargo X / 5 · Collecting changes to Return / unload when the deposit fills. Then press Step a few more times. Record the tick, food count, and fleet delivery total rather than expecting a particular vehicle to follow a particular path.
Press Run experiment for continuous live execution and Pause experiment when you have enough motion to inspect. This button runs the live world; the separate Experiments dialog configures benchmark trials.
One walker represents a possible future for the whole fleet. With five vehicles and 128 walkers, the planner considers 128 alternative joint worlds; it does not add 128 physical ants to the arena. Increasing fleet size also increases the joint action dimension. More bodies can therefore make each planning decision more expensive even when Walkers stays fixed.
Compare four harvesters with four drones#
Use four vehicles to compare harvesters with drones. Export a run you want to keep before changing these controls: both restart the scene paused and clear the current run, replay, and editor history. World edits and settings remain intact. Changing type preserves the count and starting positions while replacing each vehicle’s physical and visual defaults.
Pause, set Vehicle count to 4, and commit the input by leaving the field. Observe that the scene returns to a paused starting state with four harvesters. The supported count is any whole number from 1 to 128.
Press Step, note the food count and motion, and optionally export this short run. Four bodies are easier to distinguish from their search overlays.
Change Vehicle type to Drones. Observe the second reset: these drones start a new run rather than transforming the moving harvesters in place.
Without an explicit Flight mode override, selecting Drones automatically enables side-on 3D flight and downward gravity. Let the camera switch to its side-on view, then press Step once. Use the Side / overhead control when you want to inspect the same scene from above. Compare the state with the figure. Counts and settings matter more than an exact pixel match, which also depends on camera and display size.
Continue for a fixed number of ticks, then reset and repeat with harvesters if you want a like-for-like observation. Keep seed, planner settings, and simulated duration fixed, and write down the vehicle type for each trial.
Harvesters use a planar kart actuator: throttle, steering, and brake. Drones use a holonomic flight actuator: two body-local force components and torque. In the drone flight plane, downward gravity is always acting, so the vertical force component is also what keeps a drone from sinking. This changes both motion and physical parameters, including radius and mass. A type comparison is therefore a comparison of these complete vehicle definitions, not an isolated test of steering alone. Rockets use two action channels per vehicle; drones, karts, and harvesters each use three. The controls and planner update to match the selected type.
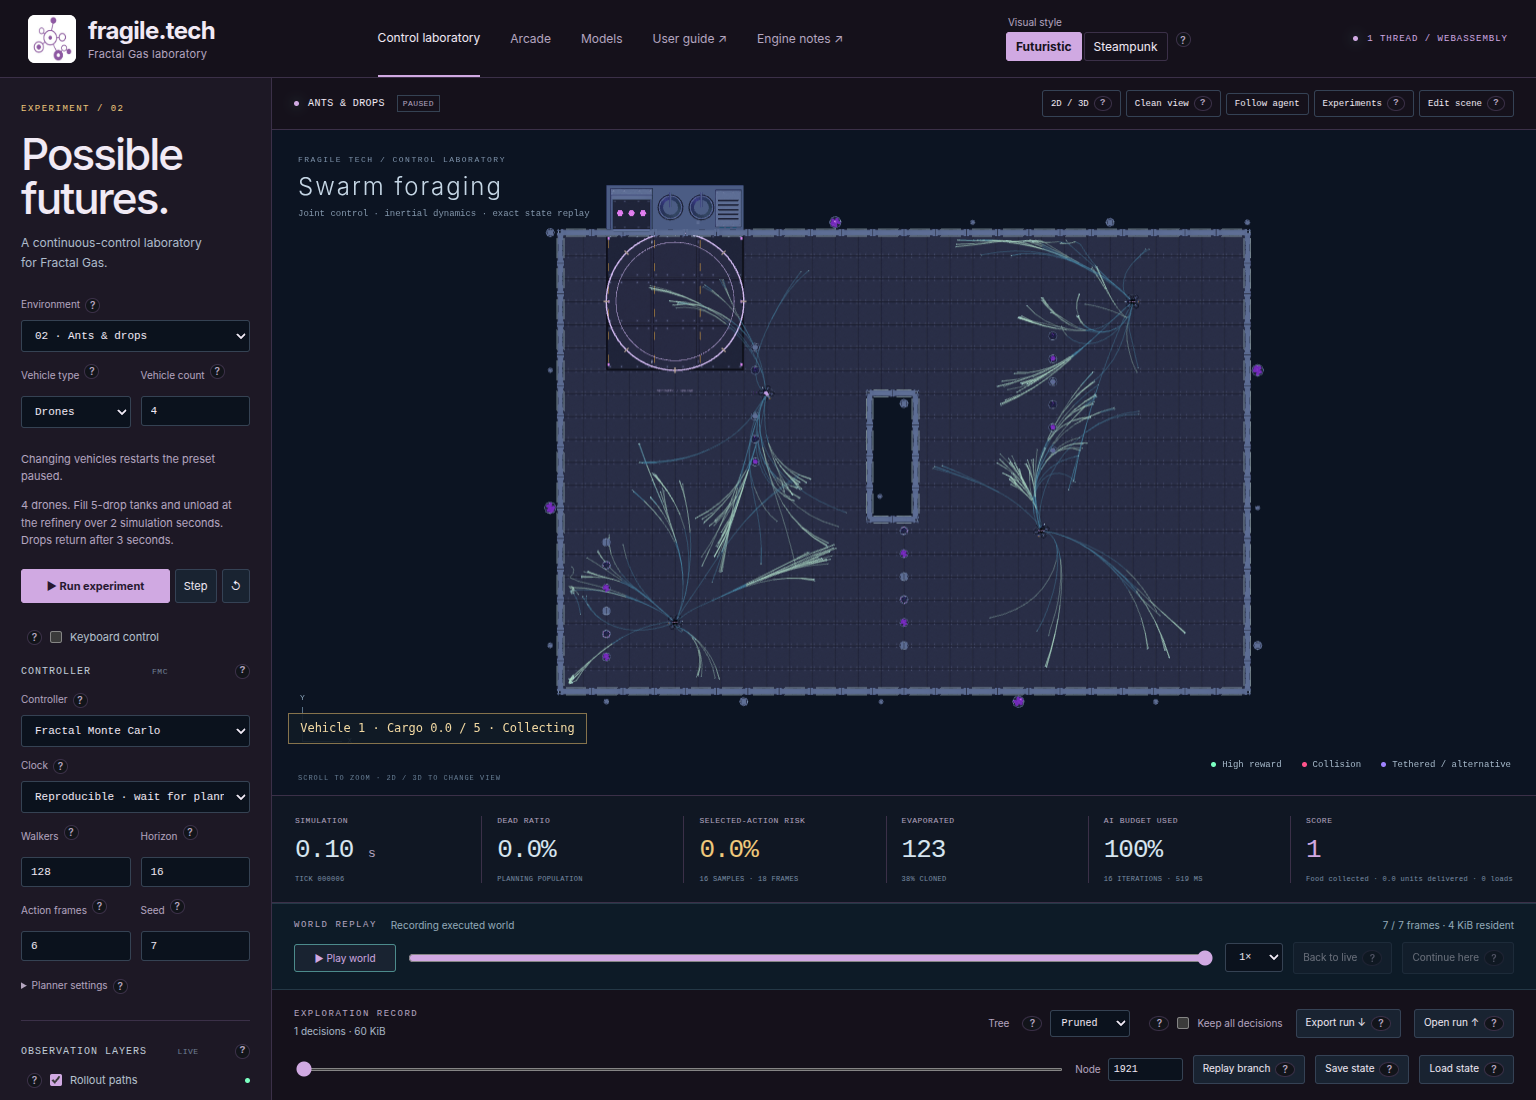
Fig. 8 Four drones after one Step with the tutorial baseline, shown in the automatically enabled side-on flight view. The smaller fleet makes individual bodies easier to inspect; a single decision need not yield a pickup.#
Drive one vehicle through a collection cycle#
Manual control helps separate the collection rule from the planner’s choices. Open Edit scene, select a vehicle, and enable Keyboard control. Click the world after using an input field so the keyboard is no longer typing into it. Without a selected body, keyboard input targets the first controlled body.
For a harvester, W / S sends positive/negative throttle, A / D sends
positive/negative steering, and Space applies its brake. For a drone,
W / S controls body-local force_x, Q / E controls body-local force_y,
and A / D controls torque. Rotate the drone and notice that its local axes
rotate with it. In side-on flight, use its upward force to counter downward
gravity; releasing that force lets the drone lose altitude. Space does not create
a brake channel on a drone.
Hold inputs briefly, observe the result, and guide the vehicle toward a drop: steer a harvester or use the drone’s force channels. A pickup is registered when the vehicle’s circular pickup reach overlaps the drop radius and its deposit can accept another unit; you do not need to align a decorative harvester attachment. Other vehicles get neutral keyboard inputs, but their momentum and collisions can still move them. Releasing all keys stops manual stepping; it does not leave an independent clock running. Disable Keyboard control before continuing autonomous operation.
Collect five drops to fill the default deposit. Each pickup earns the configured
pickup reward, and reaching capacity earns an additional full-deposit bonus.
Set that bonus with cargo.full_reward; its default is rewards.pickup. Once
full, the vehicle cannot pick up another drop, even if it touches one.
With the current preset defaults, each pickup contributes 10 reward units and
filling the tank contributes another 10. These event rewards are only components
of the total reward, which also includes shaping and any contact penalties.
Drive onto the refinery’s unloading apron. A full vehicle automatically begins
discharging, taking two simulation seconds to empty its deposit. Delivery
reward accumulates in proportion to the amount discharged: a complete load earns
rewards.delivery, currently 100 reward units. Multiple vehicles can unload at
the same time. Units delivered increases continuously during discharge;
loads increases by one only when a tank finishes emptying. The experiment
metric Cargo deliveries counts these completed loads, not individual drops.
Leaving the zone pauses discharge; returning resumes it. A partly discharged vehicle stays locked against pickups until it is completely empty. This prevents repeatedly topping up a nearly full tank to earn the full-deposit bonus. A vehicle that has only collected part of a new load cannot start unloading: fill it first. At the tutorial’s six-frame Step, two seconds is about 20 Steps inside the zone. Pausing simulation pauses discharge too.
Check a complete cycle in this order:
Watch the selected vehicle’s cargo rise toward 5 / 5. On its fifth pickup, confirm Return / unload and that another overlapping drop is not collected.
Drive its center inside the refinery’s circular zone. The vehicle need not touch the decorative processing building. Keep advancing physics while the cargo amount falls; releasing manual keys also pauses that process.
If you leave before emptying, observe the unchanged partial cargo outside the zone. Return and finish unloading. It must not collect during this interrupted return phase.
At zero cargo, confirm Collecting, five additional delivered units for a complete default tank, and one additional completed load. The vehicle can now collect again. A freshly collected partial tank cannot unload early.
For a controlled test without a long approach drive, export your scene first, then use the editor to put five pickup slots at one isolated vehicle’s starting position and center a refinery zone there. Apply the scene and advance one neutral frame with the actuator sliders. All five pickups can fill the tank in that frame; discharge begins on subsequent frames. Keep applying neutral frames until empty and check the same counters. This deliberately edited fixture tests mechanics, not the planner’s ability to navigate the original arena. Reimport your exported scene before comparing controllers.
For precise input, use Actuator channels in the editor. Set a named slider and press Apply action · 1 frame. Moving a slider alone does not simulate anything. The button applies the full joint action, so inspect other sliders too.
After a pickup, continue simulation and watch its return. Three seconds means about 180 physics frames, not three seconds spent reading this page. In the six-frame configuration that is about 30 further Steps; frame-boundary countdown effects determine the exact return frame. Pausing the world pauses respawning. A slow search can make those simulated seconds take much longer in wall-clock time.
Diagnose motion and customize the scene#
Observation |
What to check and how to recover |
|---|---|
Many dots, but only four vehicles selected |
Toggle Clean view to hide diagnostic layers. The future-state cloud contains imagined positions, not extra vehicles. |
Food does not return while paused |
Advance physics and read SIMULATION / TICK; respawn uses simulation time. |
Pickup counter stays flat |
Check cargo first: full or partly unloaded vehicles must finish unloading. Otherwise inspect available drops, the route around the central hole, and planner horizon. |
A vehicle touches drops without collecting |
Its deposit may be full or still locked during an interrupted discharge. Return to the refinery and empty it. |
Cargo does not decrease at the refinery |
A new load must reach capacity before unloading starts. Check that the vehicle is inside the unloading zone and advance simulation. |
Delivery total increases while pickup count stays flat |
The fleet is unloading previously collected cargo; these counters measure different parts of the cycle. |
Keyboard has no effect |
Enable its checkbox, remove focus from text/numeric fields, and select a controlled body. Check actuator-specific mappings. |
A drone will not brake with Space |
Use its force channels to counter motion; this actuator has no kart brake. |
A drone drops out of the side-on view |
It is falling under the preset’s downward gravity. Apply the upward body-local force and keep advancing physics. |
Run or editor history disappeared after changing count/type |
These changes restart the scene paused and clear run, replay, and editor history. World edits and settings are preserved; export a run before changing either control if you want to keep it. |
A count is rejected |
Enter a whole number from 1 through 128. Invalid input leaves the existing scene intact. |
Planning feels slow |
Pause and use four vehicles first. Reduce Walkers only as a documented new configuration; changing it resets the run. |
To build a controlled collection exercise, follow the foraging walkthrough in
Scenes, agents, and the editor: export the starting scene, move a pickup near one
vehicle, apply the edit, and test with a single Step or a manual frame. Reselect
entities after edits that rebuild the world. Use
Scene JSON reference for pickups, respawn_seconds, agent types,
and reward fields. Configure deposit size with cargo.capacity; the Ants default
is five units. Cargo settings also control discharge duration and the full-load
bonus, while refinery zones define where discharge is allowed. Scenes without
cargo settings retain their existing collection behavior.
Keep the food counter separate from accumulated reward: reward can include pickup events, full-deposit bonuses, delivery, shaping, and penalties. The planner shapes progress toward available drops while collecting and toward a refinery once full or partly unloaded. Changing destinations is not itself a reward.
Save evidence and measure collection and delivery#
Pause and use WORLD REPLAY to scrub actual motion. Jump to event… can
take you to recorded pickup, deposit-fill, and unloading events; add an Event
note and Add marker for
a useful observation. Press Export run ↓ to preserve the motion as a portable
.fgcrec archive. For device storage, enable it before Reset, then use Save
recording to flush the run. See Record, replay, and continue experiments for reopening archives,
world snapshots, and planner checkpoints. Cargo amount, unloading phase, and
delivery totals belong to native simulation state. Restoring a snapshot or
checkpoint therefore retains a partly completed discharge; replay seeking should
show the cargo state at that recorded time.
For a small benchmark, keep four drones and open Experiments. Set Variant
A to Fractal Monte Carlo and Variant B to Seeded random baseline, Seeds
to 7,11,19, Episode limit · frames to 240, Population to 128,
Lookahead · actions to 16, and Action duration · frames to 6. Leave
both parameter overrides at {} and All preset scenes unchecked. Explicitly
choose Food pickups as Success metric and 1 as Success target.
The Ants preset supplies no evaluation default, so inspect the selected goal:
Food pickups measures initial collection, Cargo deliveries measures fully
unloaded tanks, and Frames survived alone does not measure either task.
Press Run benchmark and wait for Benchmark complete. The independent trials start from the scene definition, not the live fleet’s latest positions. Success here means reaching one pickup while nonterminal before the frame limit; failure can simply mean no pickup within four simulated seconds. Neither outcome establishes long-run collection quality. Inspect all seeds, then Export experiment to save the report.
For a second benchmark of the complete task, change Success metric to Cargo deliveries, leave Success target at 1, and raise Episode limit · frames to 3600 (60 simulated seconds). Keep the other settings fixed. This trial succeeds only after at least one complete tank has been unloaded while nonterminal; five pickups alone do not satisfy it. The longer limit allows time for a return trip but does not guarantee the controller finds one. Export this report separately. When inspecting motion, record pickups, delivered units, and completed loads together with cargo capacity and discharge duration. Consult Experiments, comparisons, and performance before interpreting aggregate results.